Windows Shortcuts
· Shift + F10 right-clicks.
· Win + L (XP Only): Locks keyboard. Similar to Lock Workstation.
· Win + F or F3: Open Find dialog. (All Files) F3 may not work in some applications which use F3 for their own find dialogs.
· Win + Control + F: Open Find dialog. (Computers)
· Win + U: Open Utility Manager.
· Win + F1: Open Windows help.
· Win + Pause: Open System Properties dialog.
· Win + Tab: Cycle through taskbar buttons. Enter clicks, AppsKey or Shift + F10 right-clicks.
· Win + Shift + Tab: Cycle through taskbar buttons in reverse.
· Alt + Tab: Display Cool Switch. More commonly known as the AltTab dialog.
· Alt + Shift + Tab: Display Cool Switch; go in reverse.
· Alt + Escape: Send active window to the bottom of the z-order.
· Alt + Shift + Escape: Activate the window at the bottom of the z-order.
· Alt + F4: Close active window; or, if all windows are closed, open shutdown dialog.
· Shift while a CD is loading: Bypass AutoPlay.
· Shift while login: Bypass startup folder. Only those applications will be ignored which are in the startup folder, not those started from the registry (Microsoft\Windows\CurrentVersion\Run\)
· Ctrl + Alt + Delete or Ctrl + Alt + NumpadDel (Both NumLock states): Invoke the Task Manager or NT Security dialog.
· Ctrl + Shift + Escape (2000/XP ) or (Ctrl + Alt + NumpadDot) : Invoke the task manager. On earlier OSes, acts like Ctrl + Escape.
· Print screen: Copy screenshot of current screen to clipboard.
· Alt + Print screen: Copy screenshot of current active window to clipboard.
· Ctrl + Alt + Down Arrow: Invert screen. Untested on OS’s other than XP.
· Ctrl + Alt + Up Arrow: Undo inversion.
· Win + B : Move focus to systray icons.
General
· Ctrl + C or Ctrl + Insert: Copy.
· Ctrl + X or Shift + Delete: Cut.
· Ctrl + V or Shift + Insert: Paste/Move.
· Ctrl + N: New... File, Tab, Entry, etc.
· Ctrl + S: Save.
· Ctrl + O: Open...
· Ctrl + P: Print.
· Ctrl + Z: Undo.
· Ctrl + A: Select all.
· Ctrl + F: Find...
· Ctrl+W : to close the current window
· Ctrl + F4: Close tab or child window.
· F1: Open help.
· F11: Toggle full screen mode.
· Alt or F10: Activate menu bar.
· Alt + Space: Display system menu. Same as clicking the icon on the titlebar.
· Escape: Remove focus from current control/menu, or close dialog box.
General Navigation
· Tab: Forward one item.
· Shift + Tab: Backward one item.
· Ctrl + Tab: Cycle through tabs/child windows.
· Ctrl + Shift + Tab: Cycle backwards through tabs/child windows.
· Enter: If a button’s selected, click it, otherwise, click default button.
· Space: Toggle items such as radio buttons or checkboxes.
· Alt + (Letter): Activate item corresponding to (Letter). (Letter) is the underlined letter on the item’s name.
· Ctrl + Left: Move cursor to the beginning of previous word.
· Ctrl + Right: Move cursor to the beginning of next word.
· Ctrl + Up: Move cursor to beginning of previous paragraph. This and all subsequent Up/Down hotkeys in this section have only been known to work in Rich Edit controls.
· Ctrl + Down: Move cursor to beginning of next paragraph.
· Shift + Left: Highlight one character to the left.
· Shift + Right: Highlight one character to the right.
· Shift + Up: Highlight from current cursor position, to one line up.
· Shift + Down: Highlight from current cursor position, to one line down.
· Ctrl + Shift + Left: Highlight to beginning of previous word.
· Ctrl + Shift + Right: Highlight to beginning of next word.
· Ctrl + Shift + Up: Highlight to beginning of previous paragraph.
· Ctrl + Shift + Down: Highlight to beginning of next paragraph.
· Home: Move cursor to top of a scrollable control.
· End: Move cursor to bottom of a scrollable control.
File Browser
· Arrow Keys: Navigate.
· Shift + Arrow Keys: Select multiple items.
· Ctrl + Arrow Keys: Change focus without changing selection. “Focus” is the object that will run on Enter. Space toggles selection of the focused item.
· (Letter): Select first found item that begins with (Letter).
· BackSpace: Go up one level to the parent directory.
· Alt + Left: Go back one folder.
· Alt + Right: Go forward one folder.
· Enter: Activate (Double-click) selected item(s).
· Alt + Enter: View properties for selected item.
· F2: Rename selected item(s).
· Ctrl + NumpadPlus: In a Details view, resizes all columns to fit the longest item in each one.
· Delete: Delete selected item(s).
· Shift + Delete: Delete selected item(s); bypass Recycle Bin.
· Ctrl while dragging item(s): Copy.
· Ctrl + Shift while dragging item(s): Create shortcut(s).
· In tree pane, if any:
· Left: Collapse the current selection if expanded, or select the parent folder.
· Right: Expand the current selection if collapsed, or select the first subfolder.
· Numpad Asterisk: Expand currently selected directory and all subdirectories. No undo.
· Numpad Plus: Expand currently selected directory.
· Numpad Minus: Collapse currently selected directory.
Accessibility
· Right Shift for eight seconds: Toggle FilterKeys on and off. FilterKeys must be enabled.
· Left Alt + Left Shift + PrintScreen: Toggle High Contrast on and off. High Contrast must be enabled.
· Left Alt + Left Shift + NumLock: Toggle MouseKeys on and off. MouseKeys must be enabled.
· NumLock for five seconds: Toggle ToggleKeys on and off. ToggleKeys must be enabled.
· Shift five times: Toggle StickyKeys on and off. StickyKeys must be enabled.
· 6.) Microsoft Natural Keyboard with IntelliType Software Installed
· Win + L: Log off Windows.
· Win + P: Open Print Manager.
· Win + C: Open control panel.
· Win + V: Open clipboard.
· Win + K: Open keyboard properties.
· Win + I: Open mouse properties.
· Win + A: Open Accessibility properties.
· Win + Space: Displays the list of Microsoft IntelliType shortcut keys.
· Win + S: Toggle CapsLock on and off.
Remote Desktop Connection Navigation
· Ctrl + Alt + End: Open the NT Security dialog.
· Alt + PageUp: Switch between programs.
· Alt + PageDown: Switch between programs in reverse.
· Alt + Insert: Cycle through the programs in most recently used order.
· Alt + Home: Display start menu.
· Ctrl + Alt + Break: Switch the client computer between a window and a full screen.
· Alt + Delete: Display the Windows menu.
· Ctrl + Alt + NumpadMinus: Place a snapshot of the entire client window area on the Terminal server clipboard and provide the same functionality as pressing Alt + PrintScreen on a local computer.
· Ctrl + Alt + NumpadPlus: Place a snapshot of the active window in the client on the Terminal server clipboard and provide the same functionality as pressing PrintScreen on a local computer.
Mozilla Firefox Shortcuts
· Ctrl + Tab or Ctrl + PageDown: Cycle through tabs.
· Ctrl + Shift + Tab or Ctrl + PageUp: Cycle through tabs in reverse.
· Ctrl + (1-9): Switch to tab corresponding to number.
· Ctrl + N: New window.
· Ctrl + T: New tab.
· Ctrl + L or Alt + D or F6: Switch focus to location bar.
· Ctrl + Enter: Open location in new tab.
· Shift + Enter: Open location in new window.
· Ctrl + K or Ctrl + E: Switch focus to search bar.
· Ctrl + O: Open a local file.
· Ctrl + W: Close tab, or window if there’s only one tab open.
· Ctrl + Shift + W: Close window.
· Ctrl + S: Save page as a local file.
· Ctrl + P: Print page.
· Ctrl + F or F3: Open find toolbar.
· Ctrl + G or F3: Find next...
· Ctrl + Shift + G or Shift + F3: Find previous...
· Ctrl + B or Ctrl + I: Open Bookmarks sidebar.
· Ctrl + H: Open History sidebar.
· Escape: Stop loading page.
· Ctrl + R or F5: Reload current page.
· Ctrl + Shift + R or Ctrl + F5: Reload current page; bypass cache.
· Ctrl + U: View page source.
· Ctrl + D: Bookmark current page.
· Ctrl + NumpadPlus or Ctrl + Equals (+/=): Increase text size.
· Ctrl + NumpadMinus or Ctrl + Minus: Decrease text size.
· Ctrl + Numpad0 or Ctrl + 0: Set text size to default.
· Alt + Left or Backspace: Back.
· Alt + Right or Shift + Backspace: Forward.
· Alt + Home: Open home page.
· Ctrl + M: Open new message in integrated mail client.
· Ctrl + J: Open Downloads dialog.
· F6: Switch to next frame. You must have selected something on the page already, e.g. by use of Tab.
· Shift + F6: Switch to previous frame.
· Apostrophe (‘): Find link as you type.
· Slash (/): Find text as you type.
Gmail Shortcuts
· Note: Must have “keyboard shortcuts” on in settings.
· C: Compose new message.
· Shift + C: Open new window to compose new message.
· Slash (/): Switch focus to search box.
· K: Switch focus to the next most recent email. Enter or “O” opens focused email.
· J: Switch focus to the next oldest email.
· N: Switch focus to the next message in the “conversation.” Enter or “O” expands/collapses messages.
· P: Switch focus to the previous message.
· U: Takes you back to the inbox and checks for new mail.
· Y: Various actions depending on current view:
· Has no effect in “Sent” and “All Mail” views.
· Inbox: Archive email or message.
· Starred: Unstar email or message.
· Spam: Unmark as spam and move back to “Inbox.”
· Trash: Move back to “Inbox.”
· Any label: Remove the label.
· X: “Check” an email. Various actions can be performed against all checked emails.
· S: “Star” an email. Identical to the more familiar term, “flagging.”
· R: Reply to the email.
· A: Reply to all recipients of the email.
· F: Forward an email.
· Shift + R: Reply to the email in a new window.
· Shift + A: Reply to all recipients of the email in a new window.
· Shift + F: Forward an email in a new window.
· Shift + 1 (!): Mark an email as spam and remove it from the inbox.
· G then I: Switch to “Inbox” view.
· G then S: Switch to “Starred” view.
· G then A: Switch to “All Mail” view.
· G then C: Switch to “Contacts” view.
· G then S: Switch to “Drafts” view.
List of F1-F9 Key Commands for the Command Prompt
· F1 / right arrow: Repeats the letters of the last command line, one by one.
· F2: Displays a dialog asking user to “enter the char to copy up to” of the last command line
· F3: Repeats the last command line
· F4: Displays a dialog asking user to “enter the char to delete up to” of the last command line
· F5: Goes back one command line
· F6: Enters the traditional CTRL+Z (^z)
· F7: Displays a menu with the command line history
· F8: Cycles back through previous command lines (beginning with most recent)
· F9: Displays a dialog asking user to enter a command number, where 0 is for first command line entered.
· Alt+Enter: toggle full Screen mode.
· up/down: scroll thru/repeat previous entries
· Esc: delete line
· Note: The buffer allows a maximum of 50 command lines. After this number is reached, the first line will be replaced in sequence.
Helpful accessibility keyboard shortcuts
· Switch FilterKeys on and off. Right SHIFT for eight seconds
· Switch High Contrast on and off. Left ALT +left SHIFT +PRINT SCREEN
· Switch MouseKeys on and off. Left ALT +left SHIFT +NUM LOCK
· Switch StickyKeys on and off. SHIFT five times
· Switch ToggleKeys on and off. NUM LOCK for five seconds
Saturday, January 23, 2010
Friday, January 08, 2010
Skip RapidShare Download Limits & Waiting Timer
Everyone seems to be downloading more from rapidshare and less from other download services like Megashare, Megaupload etc and this is because its one of the best service which offers two modes – one free and second one paid in which you dont have to wait for downloading your files and you get the speedy servers which would allow you to download the files quickly. Now while you need to download a small bunch of files iam sure you wont be interested in buying a new paid account which is why iam going to tell you a small trick which would allow you to skip the rapidshare timer and also the download limits.
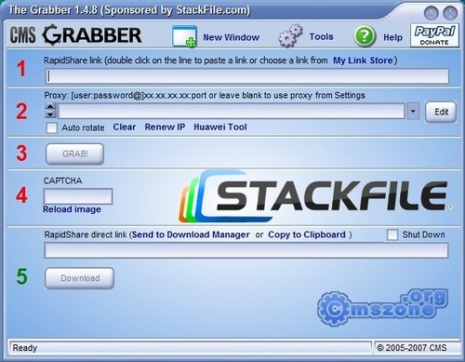
Cms Grabber
There are many programs which work as Rapidshare download managers but this one seems to be the best one because it allows you to download multiple files at once from Rapidshare. Basically it uses multiple proxy servers and starts downloading the files and works with both rapidhsare.de & rapidshare.com hosted files. You dont have to pay anything for the software because its totally free and since its a download manager in itself, you dont have to load links one by one and start downloading multiple files at once. So dont start searching for any other tool and grab the grabber now
DOWNLOAD
grabber
Thursday, January 07, 2010
TRACE WINDOWS VISTA AND WINDOWS 7 SERIAL KEYS

If you've lost your Windows 7 product key, this can very difficult to recover if you will just look for it at your registry. WinGuggle by "Unlock for Us" is a small application that can get your Windows Vista and Windows 7 Product Key easily. No Installation is needed, Just unzip the archive and launch the application.
Features
Features
Get Windows XP Product Key (CD Key)
Get Windows Vista Product Key (CD Key)
Get Windows 7 Product Key (CD Key)
Get Microsoft Office Product Key (CD Key)
Change OEM Logo and Information
Change Performance Information and Tools OEM Logo
Reset to default restores the original settings for OEM
Anti-virus program compatible
If you want to use it on Windows XP then you need to have Microsoft .NET Framework installed on your PC.
HOW TO PLAY YOUTUBE VIDEO FROM DESIRED POINT IN TIME LINE BY GIVING VIDEO URL

How to recommend something from inside of YouTube video to anybody? Suppose you want to recommend a YouTube video to a friend. You have to give him URL of video. You do not want him to see the whole video and you want to save his time and point to the specified point in that YouTube video which you want him to start watching from so that it starts playing from the time you specify for it. There is a simple way to recommend a YouTube video to watch from predefined point in timeline which you desire.
We take an example of a video. Consider the following URL.
http://www.youtube.com/watch?v=Fe751kMBwms
Now all you have to do is to add the predefined time feature in the URL.
Add following in the URL.
&feature=player_embedded#t=desired time in seconds
So that it becomes:
&feature=player_embedded#t=200
200 here is 200 seconds so that video will start playing where 200 seconds have been passed in the timeline.
Above whole URL with the specified time will become like following:
http://www.youtube.com/watch?v=Fe751kMBwms&feature=player_embedded#t=200
By this method you can save your friend's time and recommend something in YouTube video which you want him to watch and not the whole video.
SEARCHING FOR SERIALS OR CRACKS OF ANY SOFTWARE
Have you ever tried searching for serials or cracks of any software. You might have to browse thousands of websites with adult content to finally put your hands on right cracks. Those cracks might have some Spywares or Adwares which have potential danger to corrupt your PC. Its bizarre but still there are ways you can find softwares which will help you find keys, serial numbers or cracks for any software. Now that there are piracy laws are very strict but these softwares are all around the web. I am pointing towards such two softwares which will search for you any crack or serial for softwares and save you from going to or browsing thousands of illegal websites.
One software is 'Craagle' and the second one is 'Crack Down' or 'Crack Downloader'. These are meta search engines that will search serials or cracks over about 15 popular cracks sites and find them for you. No adult contents or other things, you'll get just what you search for.
Download
Use any one link below:
http://www.mediafire.com/?kn12znz5ytd
http://rapidshare.com/files/318406479/c-n-s-8767678.rar.html
http://rapidshare.com/files/318407020/c-n-s-782902389023.rar
Note: We are not responsible of the above files. Use these at your own consent whatever these are. Say no to piracy and buy original software because cracks will harm your PC.
METHOD TO REMOVE MALWARE MANUALLY
Trend Micro HijackThis is a free utility that generates an in depth report of registry and file settings from your computer. HijackThis makes no separation between safe and unsafe settings in its scan results giving you the ability to selectively remove items from your machine. In addition to this scan and remove capability HijackThis comes with several tools useful in manually removing malware from a computer. Advanced users can use HijackThis to remove unwanted settings or files.
To analyze your computer, start HijackThis and run a scan. HijackThis will display a list of areas on your computer that might have been changed by spyware. Do not change any settings if you are unsure of what to do. It is important to use extreme caution when choosing to removing anything using HijackThis. HijackThis also comes with a process manager, HOSTS file editor, and alternate data stream scanner.
Usage
· 1. Download and install HijackThis.
· Once installed, open HijackThis by clicking Start > Program Files > HijackThis and click the button labeled “Do a system scan only”.
· Once the scan is complete, click the AnalyzeThis button. A web page will open containing helpful information regarding HijackThis.
Note: Once the scan is complete, the scan button will read “Save log”. You may save the log file to your PC. Once you select where you would like to save the file, it will open in your system’s default text editor. Typically this application is Notepad.
How to Generate a Startup List Log File
· Open HijackThis by clicking Start > Program Files > HijackThis > HijackThis.
· Click the “Open the Misc Tools section” button.
· Click the “Generate StartupList log” button and a warning box will appear.
· Once you click “Yes” to continue, the log will open in your system’s default text editor.
Common Log File Uses
Once you have generated a log you can analyze the results to identify what settings have been made by malware. The web offers a wealth of resources outside of TrendSecure that can help you interpret your log file results and help you manually clean your system of malware. A common practice for novice users is to generate a HijackThis log file and submit it one of the many forums devoted to HijackThis on the web. Experts at these forums provide information on which items are causing your problems and how to remove them safely from your computer.
IMPORTANT: HijackThis does not determine what is good or bad. Do not make any changes to your computer settings unless you are an expert computer user.
RAPIDSHARE SEARCH ENGINE
Rapidshare is a file hosting goldmine if you know how to search it properly. for example: Try using follwoing code.
site:rapidshare.de inurl:ziprar7ziptar
Open google site. Put above line in search box, hit enter. You will get results of downloadable files with zip,rar,7zip and tar formats. inurl can be specified for finding files of specific format. e.g.
inurl:pdf
inurl:aviwmvmpgnva
inurl:mp3oggwma
inurl:exe
inurl:ziprar7ziptar
Now the following query will provide you direct link to download winrar software compressed in zip format.
site:rapidshare.de inurl:zip winrar
Rapidshare is one of the world’s biggest and the fastest file web hosts around the world with thousands of files being uploaded and downloaded everyday. But it does not have a search engine of its own, we can search files hosted at rapidshare and other many file hosting services directly using many resources out there as many many search engines are emerging to do this task.
Some of search engines which give you direct links of files hosted at such file hosting websites are following:
1. Avun
2. Filez
3. RapidFox
4. U2U
5. Zoozle
6. Rapidstack
7. FilesBot
8. Loadevery
9. Rapidoogle
10. Rapidzilla
11. SharingEngines
12. FilesTube
13. Xoogo
14. EatPaperRapidshare
15. RapidshareDB
16. File field
17. RapidshareURL
18. FileSearch
19. Leechaa
20. Quicksearch
21. jqd
22. MegaDownload
23. Rapidog
24. Search Any File
25. Crawl Rapidshare
26. Rapidor
27. Down2Crazy
28. rSearch
29. Download List
30. Search Files
31. Gappon
32. FileCrop
33. Search4file
34. Mega Rapid Search
35. Rapid Zearch
36. FileSearcher
37. Oneclickfiles
38. Rapidsharesearch
39. Funfail
40. Rapidshare1
41. 5iles
42. shufs
43. rapidsearch.eu
44. Kvaz
45. Files Pump
46. Search Rapidshare Files
47. Infobind
48. Search Rapidshare info
49. Javaartist
50. Coders2020
51. 4Chan
52. Rapidshare Blog Search
53. Linkosearch
54. HellaFiles
55. totme
56. ShareMiner
57. FileScoop
58. RapidSearchEngine
59. Betadir
60. RapidExplorer
61. RS Find
62. Rapidshare Index
63. RapidshareLink
64. Rapidshare Data
65. Buscador
66. Rapidshare Searcher
67. Peer2link
68. RapidOSearch
69. RapidShared
70. SearchShared
71. Rapidsearch.in
72. Rapidsharing
73. ProjectNinja
74. Rapidrat
75. Rapidlibrary
RAPIDSHARE DOWNLOAD ACCLERATOR

RapidShare is most widely used popular online file sharing hosting service. Free rapidshare account has limitations i.e. low bandwidth, difficult captcha etc. Still the number of files uploaded on Rapidshare is more then any other online file sharing website. One issue which users faces while downloading files from rapidshare is wait time and there is no free automated program for downloading set of rapidshare files. Rapidshare Plus is a solution.
It lets you download queue of rapidshare files automatically by just providing rapidshare links. Just add Rapidshare file links to Rapidshare Plus and rest of the downloading task will be done by Rapidshare Plus automatically.
It lets you download queue of rapidshare files automatically by just providing rapidshare links. Just add Rapidshare file links to Rapidshare Plus and rest of the downloading task will be done by Rapidshare Plus automatically.
• Add/Delete any number of File Links
• Add Proxy server setting
• Start/Stop Download Process
• Displays file download progress
• Time Remaining and Time elapsed display
• Current Download Speed display
• Add Proxy server setting
• Start/Stop Download Process
• Displays file download progress
• Time Remaining and Time elapsed display
• Current Download Speed display
Tuesday, January 05, 2010
Microsoft Word Hotkeys | Keyboard Shortcuts
Microsoft Word Hotkeys Keyboard Shortcuts
Keyboard Shortcut Result in Microsoft Word
CTRL and A
Selects all in the current document.
CTRL and B
Bold text.
CTRL and C
Copies the item or text to the Clipboard and can be pasted using CTRL and V.
CTRL and D
Displays the Font dialogue box.
CTRL and E
Centre Alignment.
CTRL and F
Displays the Find dialog box, to search the current document.
CTRL and G
Displays the Go to dialog box, to go to a specific location in the current document.
CTRL and H
Displays the Replace dialogue box.
CTRL and I
Italic text.
CTRL and J
Full Justification.
CTRL and K
Create Hyperlink
CTRL and L
Left Alignment
CTRL and M
Tab
CTRL and N
Creates a new document.
CTRL and O
Displays the Open File dialogue box.
CTRL and P
Displays the Print dialog box.
CTRL and R
Right Alignment.
CTRL and S
Displays the Save dialog box.
CTRL and U
Underline text
CTRL and V
Pastes the copied item or text from the Clipboard into the current position in the document.
CTRL and X
Cuts the item or text selected to the Clipboard.
CTRL and Y
Redo the last undone action.
CTRL and Z
Undoes the last action.
CTRL and ENTER
Insert Page Break.
CTRL and F2
Show Print preview.
CTRL and F4
Closes the active document window.
CTRL and F6
Opens the next document window.
Keyboard Shortcut Result in Microsoft Word
F1 key
Get help or use the Office assistant.
SHIFT and F1 Key
Context sensitive help.
F2 Key
Move text or image.
SHIFT and F2 Key
Copy Text.
F3 Key
Insert an auto text entry.
SHIFT and F3 Key
Change the case of the selected text.
F4 Key
Perform last action again.
SHIFT and F4 Key
Perform a Find or Go to action again.
F5 Key
Displays the Go to dialogue box, from here you can also Find and Replace.
SHIFT and F5 Key
Move to a previous revision.
F6 Key
Go to the next frame or pane.
SHIFT and F6 Key
Go to the previous frame or pane.
F7 Key
Launch the Spell checker.
SHIFT and F7 Key
Launch the Thesaurus.
F8 Key
Extend the current selection.
SHIFT and F8 Key
Shrink the current selection.
F9 Key
Update the selected fields.
SHIFT and F9 Key
Switch between a field code and it's result.
F10 Key
Activate the menu bar.
SHIFT and F10 Key
Display a Shortcut Menu. Same as right clicking.
F11 Key
Go to the next field.
SHIFT and F11 Key
Go to the previous field.
F12 Key
Save file As, equivalent to tools menu.
SHIFT and F12 Key
Save document, equivalent to tools menu.
Keyboard Shortcut Result in Microsoft Word
CTRL and A
Selects all in the current document.
CTRL and B
Bold text.
CTRL and C
Copies the item or text to the Clipboard and can be pasted using CTRL and V.
CTRL and D
Displays the Font dialogue box.
CTRL and E
Centre Alignment.
CTRL and F
Displays the Find dialog box, to search the current document.
CTRL and G
Displays the Go to dialog box, to go to a specific location in the current document.
CTRL and H
Displays the Replace dialogue box.
CTRL and I
Italic text.
CTRL and J
Full Justification.
CTRL and K
Create Hyperlink
CTRL and L
Left Alignment
CTRL and M
Tab
CTRL and N
Creates a new document.
CTRL and O
Displays the Open File dialogue box.
CTRL and P
Displays the Print dialog box.
CTRL and R
Right Alignment.
CTRL and S
Displays the Save dialog box.
CTRL and U
Underline text
CTRL and V
Pastes the copied item or text from the Clipboard into the current position in the document.
CTRL and X
Cuts the item or text selected to the Clipboard.
CTRL and Y
Redo the last undone action.
CTRL and Z
Undoes the last action.
CTRL and ENTER
Insert Page Break.
CTRL and F2
Show Print preview.
CTRL and F4
Closes the active document window.
CTRL and F6
Opens the next document window.
Keyboard Shortcut Result in Microsoft Word
F1 key
Get help or use the Office assistant.
SHIFT and F1 Key
Context sensitive help.
F2 Key
Move text or image.
SHIFT and F2 Key
Copy Text.
F3 Key
Insert an auto text entry.
SHIFT and F3 Key
Change the case of the selected text.
F4 Key
Perform last action again.
SHIFT and F4 Key
Perform a Find or Go to action again.
F5 Key
Displays the Go to dialogue box, from here you can also Find and Replace.
SHIFT and F5 Key
Move to a previous revision.
F6 Key
Go to the next frame or pane.
SHIFT and F6 Key
Go to the previous frame or pane.
F7 Key
Launch the Spell checker.
SHIFT and F7 Key
Launch the Thesaurus.
F8 Key
Extend the current selection.
SHIFT and F8 Key
Shrink the current selection.
F9 Key
Update the selected fields.
SHIFT and F9 Key
Switch between a field code and it's result.
F10 Key
Activate the menu bar.
SHIFT and F10 Key
Display a Shortcut Menu. Same as right clicking.
F11 Key
Go to the next field.
SHIFT and F11 Key
Go to the previous field.
F12 Key
Save file As, equivalent to tools menu.
SHIFT and F12 Key
Save document, equivalent to tools menu.
PARTITIONING YOUR HARD DRIVE USING FDISK
Nobody wants to setup their hard drive as one giant data dump. Dividing your drive into multiple partitions makes mutitasking easier. Keeping different types of data such as work documents, mp3s, video files, etc in a partition separate from the operating system can greatly increase your computer’s performance. And if you are planning on using multiple operating systems then you will absolutely need multiple partitions.
What Is Partitioning ?
A partition can be assumed as a container, like one drawer of a file cabinet. Each partition uses a file system to store and name data. Windows 98 used FAT32 which allowed greater maximum partition sizes and stored data more efficiently than the FAT16 file system of DOS and Windows 95. Windows NT introduced NTFS file system, which offers better data security and efficient memory handling. Windows 2000 and XP can read and write to both NTFS and FAT32 partitions.
Partitioning Your Hard Drive Using FDISK
![[clip_image00152]](https://lh3.googleusercontent.com/blogger_img_proxy/AEn0k_sDZkZLyqLrxY4OnfeAgDu2NR7h4guSQsLkOpqor1wYEDyrYFB6PNxQkLmmZwx6cZbEKeoKm8W46d1u5CbPiMY9GInaDMqUEiNwpXSotDlscia1eWewwsiuy9x32QJU7cADJJkGbl49Lmfv15hDP2BerD10bsQfceGbt3NWStwvZRR592iR3NeHdJXVrQdi5gYg5LyPncVX6h2tbqruwFRyoqbNfM0oveKrxYmnwHXUJpAn4lHelTUBaox9hMIEfeT77g8vIsvhSLREFhdOxQCm91-1G5avufOtzw=s0-d)

6. Press (1) to create another partition, then (2) to create an extended DOS partition. While it gives you an option to use less than full amount of space on the disk here but any space which is not allocated now can no longer be used by FDISK unless you erase the existing partitions. So accept the default (maximum available) size for the extended partition, then press ‘ESC.’ This will take you to the menu for creating logical drives in the extended partition
What Is Partitioning ?
A partition can be assumed as a container, like one drawer of a file cabinet. Each partition uses a file system to store and name data. Windows 98 used FAT32 which allowed greater maximum partition sizes and stored data more efficiently than the FAT16 file system of DOS and Windows 95. Windows NT introduced NTFS file system, which offers better data security and efficient memory handling. Windows 2000 and XP can read and write to both NTFS and FAT32 partitions.
Partitioning Your Hard Drive Using FDISK
Follow these simple steps after runnning FDISK command in command prompt to partition your harddrive:
1. First, to view a list of all drives available on your system select (5).
2. Press (4) to view partition information on the drive, then select the new hard drive.
3. Select (1) to create a partition, then on the next screen choose (1) to create a primary partition on that drive.
4. Select (y) if you wish to use all the space on the drive for this one partition(which we don’t want to), or (n) if you wish to make more than one partition on the drive now or later. If you selected (n), enter the amount of space you wish to use for the primary partition.
5. By selecting (n) it means that you do want to create multiple partitions, you must now make a secondary partition using the rest of the free space.

6. Press (1) to create another partition, then (2) to create an extended DOS partition. While it gives you an option to use less than full amount of space on the disk here but any space which is not allocated now can no longer be used by FDISK unless you erase the existing partitions. So accept the default (maximum available) size for the extended partition, then press ‘ESC.’ This will take you to the menu for creating logical drives in the extended partition
7. To create a logical drive which are represented by drive C: or D: etc, simply fill in the amount of space you require the drive to have.
After you finished performing all this procedure, Exit from FDISK, reboot to windows.
After you finished performing all this procedure, Exit from FDISK, reboot to windows.
PARTITIONING YOUR HARD DRIVE IN WINDOWS 2000/XP
Partitioning Your Hard Drive In Windows 2000/XP
To start partitioning in Windows 2000/Xp environment, right click My Computer and select Manage, once you enter into the Manage screen, from here select Disk Management.
Now you can partition your drive by following these steps.
1. Right click on the new drive and select new partition, then it will launch the partition wizard.
2. In this step it will then prompt you how much drive space you want to allocate to the new partition.
3. If you choose not to use the full amount of space for the first partition, you can create additional partitions in the same way up to a maximum of four partitions per disk.
4. Now it will ask for a drive letter which Windows will use to represent partition as C: or D: etc.
5. Once you’ve created the partitions, you’ll have to format the newly created partitions which Windows will prompt to do automatically.
6. Once formatting is complete, reboot your computer, and you’re done
To start partitioning in Windows 2000/Xp environment, right click My Computer and select Manage, once you enter into the Manage screen, from here select Disk Management.

Now you can partition your drive by following these steps.
1. Right click on the new drive and select new partition, then it will launch the partition wizard.
2. In this step it will then prompt you how much drive space you want to allocate to the new partition.
3. If you choose not to use the full amount of space for the first partition, you can create additional partitions in the same way up to a maximum of four partitions per disk.
4. Now it will ask for a drive letter which Windows will use to represent partition as C: or D: etc.
5. Once you’ve created the partitions, you’ll have to format the newly created partitions which Windows will prompt to do automatically.
6. Once formatting is complete, reboot your computer, and you’re done
HARD DISK PARTITIONING AND FORMATTING PROCEDURE
Hard Disk Partitioning and Formatting Procedure
This procedure describes how to set up a new, empty hard disk so that it is ready for an operating system to be installed on it. This process includes partitioning and formatting and results in a bootable hard disk. The procedure covers configuring the hard disk as a single large partition or splitting it into multiple, smaller partitions. The procedure provides specific instructions for using the FDISK program and is based on the Windows 95 OEM SR2 (Windows 95B) FDISK version with FAT32 support.
Warning: This procedure is intended to be used for setting up a new hard disk containing no information on it. Do not follow these steps if your hard disk has already been partitioned and formatted, or data loss will likely result.
Procedure Overview:
• Difficulty Level: 2 (Low).
• Risk Factor: 1 (Very low). This assumes that the hard disk has no data on it.
• Hardware Required: None.
• Software Required: Boot disk containing the FDISK.EXE and FORMAT.COM programs.
• Time to Perform: 5 to 20 minutes, depending on the size and speed of the hard disks.
Preparation / Warnings:
o To be safe, always run FDISK from DOS only.
o Be extremely careful when using the FDISK program, as one incorrect keystroke can result in major data loss. In particular, in a system with multiple hard disk drives be careful to make sure you are working on the right physical disk or you may accidentally end up disturbing the contents of the wrong drive. Beware that DOS drive letters can change after creating or deleting partitions, and that with multiple hard disks the partitions may be lettered in an unexpected sequence. See here for more details on this.
o Do not perform this procedure until the system is in good working order. Resolve any hardware conflicts or
other issues before commencing. o I assume that the system has been turned on and booted from the floppy disk.
o FDISK uses binary megabytes when displaying drive and partition sizes, not decimal megabytes. See this explanation of the difference for details.
o All commands in DOS or within FDISK require you to press {Enter} to select them; I'm not going to repeat it a zillion times within the procedure below.
Procedure Steps:
1. Check Version Number: At the DOS prompt, enter the following command: "ver". The system will respond with the version of DOS/Windows you have booted. Make sure that this matches whatever you want to install on the hard disk. For Windows 95 OEM SR2 the version number will be "4.00.1111".
2. Plan Partitions: Decide how you want to partition your hard disk. In particular, for large hard disks under Windows 95 OSR2, decide if you want to set up your hard disk with a single large FAT32 partition, or several smaller FAT16 partitions. (You can of course mix these). I provide instructions for doing either of these, but cannot tell you how to set up your system. You must decide based on what makes sense for you. For assistance in making this decision, and more general information on partitioning, cluster sizes and related issues, refer to this section. Most people today prefer to set up a new system using a single FAT32 partition.
3. Run FDISK.EXE: From the command prompt, enter the command "fdisk". If you have a disk large enough to warrant the use of FAT32, you will be asked if you want to enable "large disk support". Enter "Y" if you want to enable FAT32, or "N" if you do not want to enable FAT32. If you do enable this, any partitions over 500 MB that you create will be FAT32. Note that if you do not enable FAT32, you will not be able to put your entire hard disk into one partition if it is greater than 2 GB in size.
If you decided to place your entire hard disk into a single partition, then follow this step:
4. Partition Hard Disk (Single Partition): Follow these steps to set up your hard disk:
A. Select from the FDISK menu "1. Create DOS partition or Logical DOS Drive".
B. Select "1. Create Primary DOS Partition". FDISK will verify drive integrity. Then it will ask if you want to use the maximum available size of the disk for the primary partition and set it active. Enter "Y". The system will allocate the whole disk to the partition, and that's that.
C. Press {Esc} to exit FDISK.
If instead you want to set up your hard disk with multiple partitions (or if you don't have Windows 95 OEM SR2), follow this step. In order to make the process easier to follow, I am going to use an example below. In the example, a 3100 (binary) MB hard disk is being partitioned into four partitions of 1000 MB, 800 MB, 700 MB and 600 MB respectively:
4. Partition Hard Disk (Multiple Partitions): Follow these steps to set up your hard disk:
A. Select from the FDISK menu "1. Create DOS partition or Logical DOS Drive".
B. Select "1. Create Primary DOS Partition". FDISK will verify drive integrity. Then it will ask if you want to use the maximum available size of the disk for the primary partition and set it active. Enter "N". The system will show the size of the entire disk in MB.
C. Enter the size of the primary partition. In our example, this would mean entering "1000". The system will tell you that it has created the primary partition, and will assign it the drive letter "C:".
D. Press {Esc} to return to the FDISK menu.
E. Select "2. Set active partition". Select partition 1. FDISK will report that it has set partition 1 active.
F. Press {Esc} to return to the FDISK menu.
G. Select from the FDISK menu "1. Create DOS partition or Logical DOS Drive".
H. Select "2. Create Extended DOS Partition".
I. When prompted, press {Enter} to select the entire remaining area of the disk for the extended DOS partition. FDISK will report that it has created the extended DOS partition.
J. Press {Esc}. FDISK will automatically prompt you to create your first logical DOS volume within the extended DOS partition.
K. Enter the size of the first logical partition (the second partition overall). In our example you would enter "800". FDISK will create the partition, label it "D:", and then say "Logical DOS Drive created, drive letters changed or added". Don't touch anything, just wait, and FDISK will prompt you for the next volume.
L. Repeat the previous step for the remaining partitions (in our example there would be two more partitions to create, the 700 MB and 600 MB ones). When all of the partitions have been created, FDISK will report "All available space in the Extended DOS Partition is assigned to logical drives".
M. Press {Esc} to exit FDISK.
Continue with the procedure:
5. Reboot: Reboot the system using either the Reset button or the "three-fingered salute" ({Ctrl}+{Alt}+{Delete}). Make sure the floppy disk is in its drive, since you still need it. Note that you may get "Invalid media type reading drive C" errors while rebooting. This is normal at this stage.
6. Format Primary Partition: From the "A:" DOS prompt, issue the following command: "format c:/s". Do not forget the "/s", as this is what will make your C: drive bootable. You will get a "scary" warning message such as "WARNING, ALL DATA ON NON-REMOVABLE DISK DRIVE C: WILL BE LOST. Proceed with Format (Y/N)?". Since of course there is no data presently on drive C:, just enter "Y" and the system will format the hard disk. The program will show you its progress as it formats and at the end will prompt you for a volume label. Enter one if you wish.
7. Format Additional Partitions (if necessary): If you set up multiple partitions, format the additional partitions now. This is done in almost the same way as formatting the primary DOS partition, except that you leave off the "/s". So normally you would be entering "format d:", "format e:" and so on, until all the partitions have been formatted. The prompts should be the same as in the preceding step.
Warning: If you have a second hard disk in the system and it has a primary DOS partition, that partition is probably assigned D: because DOS assigns letters to all primary partitions before any logical partitions. Be careful of what you format.
8. Remove Boot Floppy: Eject the boot floppy from the floppy disk.
9. Reboot: Reboot the system using either the Reset button or {Ctrl}+{Alt}+{Delete}. The system should boot up from the hard disk this time, and stop at the "C:" prompt. Note that if you get an error such as "NO ROM BASIC, SYSTEM HALTED" or "No boot device found" at this stage, this means you forgot to set the primary DOS partition "active". Reboot from the floppy, run FDISK again and use option 2 to set the primary partition active, then reboot. If you get an error like "No operating system", this means you probably forgot the "/s" parameter when formatting the C: drive. Put the floppy disk back in the drive and then return to step 5.
HOW TO PARTITION A HARD DRIVE
Hard disks can be partitioned to run separate operating systems on the same disk, or to break down a disk into manageable chunks for storage. Partitioning is performed on a new or reformatted disk. These instructions describe using FDISK for PCs using Windows XP or later
Instructions
Step 1 Start the computer in Command Prompt Mode.
Step 2 Type "FDISK." The partition window will appear with menu options.
Step 3 Enter 5 if you're partitioning a second drive, and select the drive; otherwise, skip to the next step.
Step 4 Enter 1 (Create DOS Partition or Logical DOS Drive).
Step 5 Enter 2 (Create Extended DOS) to create a partition.
Step 6 Enter N when the program asks if you want to use the maximum available size.
Step 7 Designate the amount of disk space to allocate to the second partition (the partition will be assigned the next drive letter).
Step 8 Type a name for the new partition and press Enter. The partition menu will appear.
Step 9 Repeat steps 5 through 8 to create additional partitions.
Step 10 Press Esc to exit the partition command.
Tips & Warnings
- Be sure to allocate ample disk space (about 20 GB) on the C drive to hold Windows software and temp files created by other software programs.
- Commercial products, such as Partition Magic, make hard disk partitioning much easier.
- The FDISK procedure deletes all files on the hard disk. This action is not reversible. Be sure to back up any files you want to keep.
- If the disk capacity displayed in the FDISK menu doesn't match your hard drive, then your system doesn't support larger disk drives. Use disk management software, such as Disk Manager or EZ-Drive, to provide support for larger drives.
HOW TO DELETE A VIRUS WITHOUT AN ANTI-VIRUS PROGRAM
Want to delete viruses without spending lots of money on a decent Anti-Virus? Read up
Instructions
Step 1 Click on "START". Click on "RUN" and type "REGEDIT".
Step 2 Now you will see "registry editor" opened in a new window. In registry editor select -> HKEY_LOCAL_MACHINE.
Step 3 Now under "HKEY_LOCAL_MACHINE" select--->"SOFTWARE"--->"Mcft"--->"WINDOWS"--->"CurrentVerison"--->"RUN".
Step 4 Now on the right side select"RavTimeXP"Right click on "RavTimeXP" and delete it.Close REGISTRY EDITOR and restart your computer.
Step 5 Click on START--->SEARCH--->"FOR FILES OR FOLDERS".Search box will open with current setting.Now click on search(searching for .exe), after searching is finished you will see the results.
Step 6 Now here you have to delete the icons like folders and size 60KB or a little more than 60 KB or little less than 60 KB, and the file type will be "APPLICATION".Now delete them all.(Note, Remember to double click, otherwise you will have to restart and start from step 1)
Step 7 Now Empty Recycle Bin. And you are done.
HOW TO RECOVER DELETED ITEMS FROM A HARD DRIVE
If you have accidentally deleted files from your computer, or lost them because of a hard drive crash, the good news is you can recover them. Recently deleted files can be traced, and recovered using a free, easy to use recovery program.Recuva Data Recovery uses a simple but effective wizard system that searches for images, documents, music and video files that have been deleted, erased or lost on your PC hard drive.
Instructions
Things You'll Need:Recuva Data Recovery program
Step 1 Download Recuva Data Recovery (see Resources). Follow the setup and installation instructions to install it to your computer.
Step 2 Launch Recuva. The recovery wizard window will open up.
Step 3 Click "Next" on the recovery window, then select the file type you want to search for by file extension--for example .mp3, .jpg or .doc. Click "Next."
Step 4 Select your hard drive from the "File Location window, then click "Next." Click the "Enable Deep Scan" check-box if you want a more detailed scan. This option can take hours to scan, but has a better chance of locating your file.
Step 5 Click "Start" to begin the search. When it is complete, your traced files will be listed on a new window.
Step 6 Check the files you want to recover, then click "Recover" on the lower right of your program. Select a location to recover your files to, then click "OK" to finalize the recovery process.
Saturday, January 02, 2010
TIPS TO IMPROVE SYSTEM SPEED
Tips To Improve System Speed
When installing new Softwares disable the option of having a tray icon. The tray icons use up available RAM, and also slow down the booting of your PC. Also disable the option of starting the application automatically when the PC boots. You can disable these options later on also from the Tools or preferences menu in your application
-------------------------------------------------------------------------------
Always make two partitions in your hard drive. Install all large Softwares (like PSP, Photoshop, 3DS Max etc) in the second partition. Windows uses all the available empty space in C drive as virtual memory when your Computer RAM is full. Keep the C Drive as empty as possible.
------------------------------------------------------------------------------
Defragment your hard drive once every two months. This will free up a lot of space on your hard drive and rearrange the files so that your applications run faster.
---------------------------------------------------------------------------------
Delete the temporary internet files regularly
--------------------------------------------------------------------------------
Empty the recycle bin regularly. The files are not really deleted from your hard drive until you empty the recycle bin
--------------------------------------------------------------------------------
Refresh the desktop after closing any application. This will remove any unused files from the RAM.
REGEDIT KEYBOARD SHORTCUTS
REGEDIT Keyboard Shortcuts
Searching
"Ctrl+F" -- Opens the Find dialog box.
"F3" -- Repeats the last search.
Browsing
"Keypad +" -- Expands the selected branch.
"Keypad -" -- Collapses the selected branch.
"Keypad *" -- Expands all the selected branch's sub keys.
"Up Arrow" -- Selects the previous key.
"Down Arrow" -- Selects the next key.
"Left Arrow" -- Collapses the selected branch if it's not collapsed; otherwise, selects the parent key.
"Right Arrow" -- Expands the selected branch if it's not already expanded; otherwise, selects the key's first sub key.
"Home" -- Selects My Computer.
"End" -- Selects the last key that's visible in the key pane.
"Page Up" -- Moves up one page in the key pane.
"Page Down" -- Moves down one page in the key pane.
"Tab" -- Moves between the key and value panes.
"F6" -- Moves between the key and value panes.
Others:
"Delete" -- Deletes the select branch or value.
"F1" -- Opens Regedit's Help.
"F2" -- Renames the selected key or value.
"F5" -- Refreshes the key and value panes.
"F10" -- Opens Regedit's menu bar.
"Shift+F10" -- Opens the shortcut menu for the selected key or value.
"Alt+F4" -- Closes Regedit.
INCREASE YOUR RAM SPEED
Increase your RAM SPEED and so system speed
1). Start any application, say Word. Open some large documents.
2). Press CTRL+SHIFT+ESC to open Windows Task Manager and click Processes tab and sort the list in descending order on Mem Usage. You will notice that WINWORD.EXE will be somewhere at the top, using multiple MBs of memory.
3). Now switch to Word and simply minimize it. (Don't use the Minimize All Windows option of the task bar).
4). Now go back to the Windows Task Manager and see where WINWORD.EXE is listed. Most probably you will not find it at the top. You will typically have to scroll to the bottom of the list to find Word. Now check out the amount of RAM it is using. Surprised? The memory utilization has reduced by a huge amount.
5). Minimize each application that you are currently not working on by clicking on the Minimize button & you can increase the amount of available RAM by a substantial margin. Depending upon the number and type of applications you use together, the difference can be as much as 50 percent of extra RAM.
In any multitasking system, minimizing an application means that it won't be utilized by the user right now. Therefore, the OS automatically makes the application use virtual memory & keeps bare minimum amounts of the code in physical RAM.
INTERNET EXPLORER HOTKEYS/KEYBOARD SHORTCUTS
Internet Explorer Hotkeys keyboard Shortcuts
These are achieved by holding down the CONTROL (CTRL) key and pressing the assigned key
--------------------------------------------------------------------------------
To Select all items on a webpage use CTRL and A.
To Copy a selected item to the clipboard use CTRL and C.
To Paste an item from the clipboard into a document use CTRL and V.
To Add the current page/document to your favorites use CTRL and D.
To Open the IE search utility use CTRL and E.
To Open the FIND box to search the current document use CTRL and F.
To Open the History utility use CTRL and H.
To Open the Favorites utility use CTRL and I.
To Go to a new location/document use CTRL and L. Also CTRL and O.
To Open a new Explorer window use CTRL and N.
To Print the current page/document use CTRL and P.
To Refresh the current page/document use CTRL and R. Also you can use the F5 key.
To Save the current document/page use CTRL and S.
To Close the current Explorer window use CTRL and W.
--------------------------------------------------------------------------------
These are achieved by holding down and pressing a combination of keys
To go to your default homepage use ALT and the HOME key.
To go forward one page (equivalent to the FORWARD button) use ALT and the right arrow key.
To go back one page (equivalent to the BACK button) use ALT and the left arrow key
IMPORTANT REGISTRY TRICKS
Registry tricks
Display Your Quick Launch Toolbar Tip:
Is your Quick Launch toolbar missing from the taskbar?
To display your familiar Quick Launch toolbar:
Right-click an empty area on the taskbar, click Toolbars, and then click Quick Launch.
Easy as that your Quick Launch bar appears. To add items to your Quick Launch toolbar, click the icon for the program you want to add, and drag it to the Quick Launch portion of the taskbar.
====================================================================================
How to remove recycle bin from your desktop Tip:
Open Regedit by going to START - RUN and type Regedit and hit enter. Then you should navigate to following entry in registry HKEY_LOCAL_MACHINE\SOFTWARE\Microsoft\Windows\CurrentVersion\Explorer\
Desktop\NameSpace\{645FF040-5081-101B-9F08-00AA002F954E} and delete it. This action should remove recycle bin from your desktop.
=====================================================================================
How to stop new programs installed balloon from coming up tip:
Right click on START button and select properties. Click on Customize and go to Advanced tab and deselect check box saying "Highlight newly installed programs". This would help you stop this annoying feature from popping up every now and then.
=====================================================================================
Unlock Toolbars to Customize Them Tip:
The new Windows XP now features locking toolbars, and you can adjust them. You may customize a lot of the Windows XP features such as the Taskbar, Start Menu, and even toolbar icons in Internet Explorer and Outlook Express. Remember your right-click:
* Right-click on a toolbar, and then click Lock the Toolbars to remove the check mark.
* Right-click on the toolbar again, and then click Customize.
You may add or remove toolbar buttons, change text options and icon options. When you've got the toolbar customized, click Close. Now right-click on the toolbar and then click Lock the Toolbars to lock them in place. com
=====================================================================================
Want to remove shared documents folder from My Computer window tip:
Some don't like my shared documents folder option. If you are one of that, here is a trick to remove it.Open registry editor by going to START-RUN and entering regedit.
Once in registry, navigate to key HKEY_LOCAL_MACHINE \ SOFTWARE \ Microsoft \ Windows \ CurrentVersion \ Explorer \ My Computer \ NameSpace \ DelegateFolders You must see a sub-key named {59031a47-3f72-44a7-89c5-5595fe6b30ee}. If you delete this key, you have effectively removed the my shared documents folder.
=====================================================================================
How to improve on shutdown time ? Close apps automatically & quickly at shutdown tip:
Open Registry by going to START-RUN and typing REGEDIT. Navigate to HKEY_CURRENT_USER\CONTROL PANEL\DESKTOP and look for AutoEndTasks. On my computer default value is 0. Change it to 1. Thats all. Further more you can reduce the time it takes for Windows to issue kill directive to all active/hung applications.
In doing this only constraint that you should make sure exists is that HungAppTimeout is greater than WaitToKillAppTimeout. Change the values of WaitToKillAppTimeout to say 3500 (since default value for HungAppTimeout 5000 and for WaitToKillAppTimeout is 20000)
=====================================================================================
Are you missing icons Tip:
Are you missing icons? You may be wondering where all the icons from your desktop are in Windows XP? Well if you're like me, you like to have at least My Computer, My Network Places, and My Documents on the your desktop.
You need to:
* Right-click on the desktop, and then click Properties.
* Click the Desktop tab and then click on Customize Desktop.
* Put a check mark in the box next to My Document, My Computer, My Network Places, or Internet Explorer, to add those familiar icons to your desktop. Easy yes!
=====================================================================================
How to login as administrator if you don't see it available tip:
Unless and until you have run into issues and fixing XP (under which case you have to go to Safe Mode to login as Administrator), you can get to administrator screen by simply pressing CTRL+ALT+DELETE twice at the main screen.
=====================================================================================
Speedup boot up sequence by defragmenting all key boot files tip:
Open Registry by going to START-RUN and typing REGEDIT. Navigate to HKEY_LOCAL_MACHINE\SOFTWARE\Microsoft\Dfrg\BootOptimizeFunction. In right hand panel look for Enable. Right click on it and set it 'Y' for enable. This is the way I have it set on my computer. This will help speedup boot time.
=====================================================================================
Use a Shortcut to Local Area Network Connection Information Tip:
Here's something new in Windows XP, instead of using the command line program and typing ipconfig to get local area network information, you can try using the following shortcut:
* Click on Start, point to Connect to, and then click Show All Connections.
* Right–click the connection you want information about, and then click Status.
* In the connection Properties dialog box, click the Support tab.
* For more information, click on the Advanced tab.
To automatically enable the status monitor each time the connection is active, in the connection Properties dialog box, select the Show icon in taskbar notification area when connected check box.
=====================================================================================
Do you know you can have Virtual Desktops (like in Linux) with PowerToys ?
If you have powertoys installed on Windows XP Its available for free at Microsoft download webpage. It is very easy to enable Microsoft Virtual Desktop Feature. Simply right click on the Start Panel Bar also called TaskBar, Click on Tool Bar and select Desktop manager.
You would see a set of 5 icons placed on the right portion of the TAskBar. Click on number 1 to 4 to go to any of the desktops. Now you have have four different Active Desktops.
IMPORTANT NOTE: You may see a little degradation in performance.
=====================================================================================
Customize Internet. Explorer Title bar tip:
This tip won't make your computer any faster but may help personalize your computer experience. Open Registry by going to START-RUN and typing REGEDIT. Navigate to HKEY_CURRENT_USER\Software\Microsoft\Internet. Explorer\Main. In right hand panel look for string "Window Title" and change its value to whatever custom text you want to see.
Easy Text Size Change in Help & IE Tip:
I mentioned a way that you can change the size of the text that is display in the Help file and in Internet Explorer. As it turns out if you have a "wheel mouse," there is an even easier way to change the text size. In Internet Explorer or when viewing a Help file, simply hold the ctrl key while you spin the mouse wheel up to increase text size, or down to decrease text size.
Java VM: Java applets run in Internet Explorer 6 (a component of Windows XP) just as they run in older versions of Internet Explorer. The Java VM is not installed as part of the typical installation, but is installed on demand when a user encounters a page that uses a Java Applet. For more information see the Microsoft Technologies for Java Web site.
=====================================================================================
Windows XP Shutdown and Power Off Tip:
On some computers, by default, Windows XP doesn't power off the computer when you tell it to shut down. However, if your computer is relatively new, it can probably by shut completely off by WinXP. To configure your computer for this behavior, simply open the Control Panel, open Performance and Maintenance, then Power Options. On the APM tab, check next to "Enable Advanced Power Management support," then click OK. The next time you choose "Shut Down" from the Start Menu, your computer should shut down completely and then power off.
=====================================================================================
Customize Explorer Toolbar Tip:
In Windows Explorer, you can customize the toolbar to make Explorer even more handy. The Toolbar is the bar of icons directly underneath the menu bar. It contains icons for going back, up one level, displaying folders or search, etc. You can right-click an open area of this Toolbar and choose Customize to change the order of these icons, and even to add new icons to it. For instance, I like to add the Map Drive and Disconnect buttons. In Windows XP, you may have to unlock the Taskbar before you can make changes in Windows Explorer.
Lock the Taskba - If you find that your Windows XP Taskbar keeps being changed, or moved to one side or the top of your screen, and you didn't mean to have it do that, this tip is for you. Once you have your Task Bar arranged the way you like it, in the right location on the screen, and with all the right toolbars and icons, you can lock it, so that it won't get changed accidentally. To lock the Taskbar, simply right click it and choose Properties. In the window that appears, check the box (click) next to "Lock the Taskbar." Now you won't accidentally bump the mouse and have your Task bar end up on another side of the screen.
=====================================================================================
Check Personal Firewall Status Tip:
In the previous tip, I mention how to turn on Windows XP's Personal Firewall feature. But once you turn it on, your connection looks just the same as it did before. How can you check the status of the connection and the firewall? Simply open Control Panel from the Start Menu, open Internet and Network Connections, then Network Connections. By default the view is of large icons.
Click the View Menu, and choose "details" in order to reveal several more columns of information about the connections that your computer has. Check the Status column to see if your connection is currently connected, and whether or not it is "firewalled." You can even drag the column headings around (I like to slide the Status column right next to the Name column. You can even remove entire columns by right-clicking the column heading and unchecking it.
=====================================================================================
Where does Window's Product Id get stored Tip:
There are two places at least where ProductId gets stored. To see the first place, open Registry by going to START-RUN and entering REGEDIT and Navigate to [HKEY_LOCAL_MACHINE\SOFTWARE\Microsoft\Windows NT\CurrentVersion]. In right pane, look for key by the name "ProductId". This is your Windows Product Id. Alternatively you can navigate to [HKEY_LOCAL_MACHINE\SOFTWARE\Microsoft\Windows\CurrentVersion] and still find same field with the name ProductId.
=====================================================================================
You can Keep Your Favorite Programs on Top of the Start Menu tip:
Do you have a favorite program that you frequently use? Elevate its priority on the Start menu by putting it at the top of the list. This ensures that the program will remain on the Start menu and cannot be bumped by other programs, even if you use the others more frequently.
Right-click the link to your favorite program on the Start menu and select Pin to Start Menu.
Your program will be moved permanently to the top part of the list, just below your browser and e-mail programs.
=====================================================================================
Having problems with Outlook Express ? Does it ask for password every time you connect tip:
If this is problem for you. Sometimes no matter what you do, Outlook Express forgets your password and asks you to enter it again each and every time you connect to your mail server.I have a solution that may work for you. Open Registry by going to START-RUN and entering REGEDIT and Navigate to HKEY_CURRRENT USER\Software\Microsoft and look for "Protected Storage System Provider". There is a good chance that you will see this folder. If you have it. Simply delete it. More than likely, you have solved your problem.
=====================================================================================
How to avoid auto play of CD ? Way I like best tip.
Hey this time no registry trick even though there are ways in registry to do it. In earlier operating systems only those CD that had autorun.inf file in their root directory were able to execute on its own but with advent of WINDOWS XP it has become possible with just about anything. Well sometimes it is good but there are other times when you want to avoid this part of automation. What would I do. Simply press SHIFT key when you enter a CD in your CD drive. It won't Auto play. For those of you, who do want a registry hack. Here it is:
Open Registry and navigate to [HKEY_LOCAL_MACHINE\SOFTWARE\Microsoft\Windows\CurrentVersion\policies\Explorer] and look for key "NoDriveTypeAutoRun" and set its value to 185 (decimal). This would stop autoplay.
=====================================================================================
This tip to speed up the Start Menu in Windows XP.
Did you know you can customize the speed of the Start Menu by editing a Registry Key.
* Click Start, and then click Run.
* Type Regedit in the box, and then click OK.
* Expand the menu in the left panel and select the HKEY_CURRENT_USER\Control Panel\Desktop folder.
* Scroll down in the right panel and double click on the MenuShowDelay file.
* In the Value Data box, change to default value for the menu speed from 400 to a lesser number, such as 1.
*Click OK.
Caution: Incorrectly editing the registry may severely damage your system. Before making changes to the registry, you may want to back up any valued data on your computer.
=====================================================================================
Customizing Windows Explorer Context menu (right click menu in windows explorer)
Ever wondered how does the right click menu (which is actually a context menu) work ? For example, when I right click in windows explorer, I see an option which says "open command window here". Do You know why I see this ? Well I see this because I have following entries in my registry.
[HKEY_CLASSES_ROOT\Drive\shell\cmd]
@="Open Command Window Here"
[HKEY_CLASSES_ROOT\Drive\shell\cmd\command]
@="C:\WINDOWS\System32\cmd.exe /k cd "%1""
If You have never used a tweaking utility and have newly installed Windows XP, You would not see this option. You would have to navigate to [[HKEY_CLASSES_ROOT\Drive] go and create two subkeys ("cmd" and within that "command" and would have to put the text "Open Command Window Here" without quotes in default string value of "cmd" key and the text "C:\WINDOWS\System32\cmd.exe /k CD"%1"" without quotes in default string value of command key). After this You need to REBOOT for these changes to take effect.
Trick is in adding similar entries for other applications as well even though its much harder to come with ideas about what to put in the context menu!!!! .
TIPS TO KEEP YOUR SYSTEM FASTER
Follow these tips and you will definitely have a much faster and more reliable PC!
1. Wallpapers: They slow your whole system down, so if you're willing to compromise, have a basic plain one instead!
--------------------------------------------------------------------------------
2. Drivers: Update your hardware drivers as frequently as possible. New drivers tend to increase system speed especially in the case of graphics cards, their drivers are updated by the manufacturer very frequently!
--------------------------------------------------------------------------------
3. Minimizing: If you want to use several programs at the same time then minimize those you are not using. This helps reduce the overload on RAM.
--------------------------------------------------------------------------------
4. Boot Faster: The 'starting Windows 95/98' message on startup can delay your booting for a couple of seconds. To get rid of this message go to c:\ and find the file Msdos.sys. Remove the Read-Only option. Next, open it in Notepad or any other text editor. Finally, go to the text 'Options' within the file and make the following changes: Add BootDelay=0. To make your booting even faster, set add Logo=0 to remove the Windows logo at startup.
--------------------------------------------------------------------------------
5. Restart only Windows: When restarting your PC, hold down Shift to only restart Windows rather than the whole system which will only take a fraction of the time.
--------------------------------------------------------------------------------
6. Turn Off Animations: Go to Display Settings from the Control Panel and switch to the Effects Tab. Now turn off Show Windows Content While Dragging and Smooth Edges on Screen Fonts. This tip is also helpful with Windows XP because of the various fade/scroll effects.
--------------------------------------------------------------------------------
7. Faster Start-Menu Access: Go to the Start menu and select Run. Now type Regedit and hit Enter. The Registry Editor will appear on the screen. Now, open the folder HKEY_CURRENT_USER\Control Panel\Desktop. You should see a MenuShowDelay value. If you don't then do the following: right click on a blank space in the right pane and select New\String. Change the name in the new value to MenuShowDelay. Now that we have the MenuShowDelay value, double click on it and enter 0 in the value data field. This sets the start menu delay to 0 milliseconds.
HOW TO FLASH BIOS OR FORGOT BIOS PASSWORD
Forgot BIOS Password ?
Do the following :
1. Open the CPU
2. Now, observe the motherboard.
3. You notice a coin like silver Battery(3V).
----------------------------------------- NOTE --------------------------------------
This battery is 24 x 7 power supply for the BIOS, which is used to run the system clock will the main power is off. It also initiates the booting process when power is switched on.
-------------------------------------------------------------------------------------
4. Remove the battery from the motherboard.
(It is safe to remove the Battery)
5. Wait 30 seconds and place the battery back on the motherboard.
6. Now, when you start your system you won't be prompted for the BIOS password.
Enjoy !!!
------------------------------------ CAUTION ----------------------------------------
1. Perform on your own risk !
2. You have to set the time of your computer when you start again.
-------------------------------------------------------------------------------------
METHOD TO REMOVE VIRUS MANUALLY
METHOD TO REMOVE VIRUS MANUALLY
If you are tired of sitting and waiting for your anti-virus software to remove the new virus infection, the steps below are for you. No programming skills are required! Just a basic knowledge of command prompt syntax will do...for this demo, the virus is on the portable USB drive (e:\virus) named virus.vbs
NOTE: FIRST OPEN YOUR COMPUTER IN SAFEMODE AND AFTER THIS FOLLOW THESE STEPS.
1. Create a back-up. Safety comes above all else. Save your files on removable storage or on another partition aside from the Windows drive.
2. Run the Windows command prompt. You can run the Windows command prompt by either clicking on the Start Menu\All programs\Accessories\Command Prompt or by pressing Windows + R on the keyboard and typing "CMD."
3. Look for the directory or folder where the virus resides. Go to the folder where the virus is hiding. Its usually resides on the Windows temporary folder or on the Windows system folder. Check partitions and drives for viruses, e.g. type "cd e:\virus"
4. Show the hidden virus and remove its attributes. It will be easier if you can see the virus. Remove the virus attributes, which are read only, archive, system file, and hidden file. e.g. type "attrib -r -a -s -h virus.vbs"
5. Delete the virus. Say goodbye to the virus by deleting it, e.g. type "del virus.vbs"
UNLIMITED DOWNLOAD FOR FREE USER(RAPIDSHARE)
Unlimited Download: IP Address
RapidShare doesn't only limit the free users with download time, but also the number of downloaded files. If you download more than one file at the same time, Rapidshare will block IP addresses, so free users will only be able to download another file after the previous download process is complete.
Here are some ways to change the IP address (or 'show' a different IP address to RapidShare) so that you can download RapidShare files with no IP address blocking.
1. Clear your browser from cookies.
For Firefox:
- On the Tools menu, click Options ...
- Having emerged Options box, click Show Cookies ... button on the Privacy.
- Click Remove All Cookies button to clear the browser from the existing cookies.
For Internet Explorer:
- On the Tools menu, click Options ...
- Having emerged Options box, click the Delete Cookies button
2. To obtain a new IP address from ISP (for dynamic IP users):
- Click the Start menu -> Run
- In the dialog box that appears, type cmd and then click OK.
- At the command prompt appears, type the following command:
ipconfig / flushdns
ipconfig / release
ipconfig / renew
exit
COUNTER TIME FOR MOZILLA FIREFOX : TIX NOW! (RAPIDSHARE)
Counter Time: Tix Now!
If you use Mozilla Firefox browser, there are add-ons that can be used to eliminate waiting time in Rapidshare.
Here's how to install Tix Now! the Mozilla Firefox browser.
1. Open the Firefox browser.
2. Address in the address bar https: / / addons.mozilla.org/en-US/firefox/addon/3601 then press Enter.
3. As add-ons page Tix Now! already appears, click the Add button to Firefox.
4. In the new Software Installation window that appears, click Install Now button.
5. Restart Firefox.
6. Select Add-Ons on Forefox browser's Tools menu.
7. Click Options in the Add-ons box.
8. To create an icon Tix Now! In the status bar, check mark on Show icon on the status-bar and then click OK.
9. To use, when you begin downloading and appear counter time, click the icon TiX Now! which is in the bottom right corner of the Firefox browser page.
10. After TixNow icon is clicked, you can directly download without having to wait longer.
NO LONGER NEED TO WAIT FOR TIME TO DOWNLOAD RAPIDSHARE
Counter Time: JavaScript
The following trick means that you no longer need to wait for time to download RapidShare files using javascript.
The script to be used to reset the download counter is:
javascript: c = 0; void (0);
or
javascript: var c = 0
or
javascript: alert (c = 0)
Here are the steps to remove counter time.
1. Type download links Rapidshare files which will be downloaded into the address bar.
2. When the counter time that you have to wait for time to download appears delete the existing download link in the address bar and replace it with one of the above scripts.
3. After that, time will directly counter back to 0 (zero) and you can directly download the file without having to wait longer.
To speed up the time and so as not to repeatedly write the script, I recommend you bookmark it in your browser.
If you are using Internet Explorer, here's how to bookmark script:
1. Click Add to Favorites ... on the Favorites menu.
2. Give a name (eg 'counter time rapidshare') to be added Favorites and then click OK.
3. Right click on the 'counter time rapidshare' or other name you have selected and then click Properties.
4. Type the script javascript: c = 0; void (0); or javascript: var c = 0; in the URL textbox and then click OK.
If you use Mozilla Firefox, here's how to bookmark script:
1. Select Bookmark This Page ... to the Bookmarks menu.
2. Give a name for the bookmark you want to add and click OK.
3. Right-click on the name of the bookmark and select Properties.
4. In the dialog box that appears, write the script in the Location box and click OK.
5. To use, when you begin downloading and counter time appears, click the name of the bookmark that you have created.
Subscribe to:
Comments (Atom)