Wednesday, January 08, 2014
How to backup Original Stock ROM on Android Phone
How to backup Original Stock ROM on Android Phone
A number of time when you plan to root your mobile phone you just ignore the original factory OS. That is the biggest mistake we go. It is very important that you must backup your original ROM. It will help you to restore all the settings/features back to the device if you are not happy with the custom rom installed on your device. There is a common process for almost all devices. You can just backup the rom and restore it back simply how you install a custom rom.
There is no guarantee that whichever custom rom you are trying to install in your android phone will be stable or perfect. There use to bugs many times in many custom roms. The most common bug is battery drain. At that point there is no way to go back. Your warranty is also voided when you root the device. And you cannot carry the phone to service center with that custom rom. So below are some common ways to backup your Original Stock ROM before you do Rooting or Custom Rom installation.
Method 1 : Backup via Nandroid Backup :
Requirements:
• The most important requirement here is that you will need to root the device. Or else you cannot backup the original rom. The process is extremely simple. When you root the device you gain additional permission on the same. Rooting gives you super user right. Rooting is simply not complicated. You can click on the following guide to read the rooting process: How to Root HTC One X for installing Custom ROMs.
• Download NANDROID Backup App from Google Play
• Ensure that your phone is connected to a charger or there must be more than 70% battery left in it.
Steps to backup Original Android ROM through Nandroid:
• Install NandRoid Backup App in your Device.
• Ensure that your device is rooted by running Root Checker application
• Turn off your phone and boot in Recovery Mode. For that press Home + Volume down + Power Key.
• In the Recovery mode press Alt+B to run the Backup.
Method 2: Backup via ClockWorkMod Recovery:
Requirements:
• Download ClockWorkMod Recovery. CWM replaces your existing bootloader and adds more additional options to the device. It offers you a full user permission to perform recovery and restore and works really well.
• Download ROM Manager Backup App from Google Play
• Just Ensure that your phone has maximum battery left.
Steps to backup Original Android ROM through CWM :
1. Install ClockWorkMod Recovery on your mobile device. You can simply download that form Google Play
2. When you install it your bootloader is replaced. It offers you full permission to play with the internal ROM. Rooting also void warranty.
3. After installing CWM your device is rooted. We can now move ahead with the backup process.
4. Install ROM Manager Backup Application in your mobile device. You can download it from here.
5. Open the Application. Tap on Flash ClockWorkMode Recovery Option.
6. Tap on Backup Current Rom. Add a file name and then backup the phone.
7. The app will ask you to grant SuperUser Permission. So allow it.
8. Once the Backup is over the phone will restart automatically.
9. With the help of same application you can also restore the existing ROM. You just need to go in Manage and Restore Backup and from there click on Restore.
Wednesday, August 28, 2013
How to Root Your Android Device & Why You Might Want To
You’ve probably heard of people “rooting” their Android phones.
If you’ve ever wondered how to do that yourself –
or wondered why people would bother – you’re in luck.
You can root your Android in just a few minutes.
If you’ve ever wondered how to do that yourself –
or wondered why people would bother – you’re in luck.
You can root your Android in just a few minutes.
After rooting your device, you have full access to the entire system and can run special types of apps that require root permissions. These apps can disable bloatware, control app permissions, enable tethering, and do lots of other cool things.
What is “Root,” Anyway?
Android is based on Linux. On Linux and other UNIX-like operating systems, the root user is equivalent to the Administrator user on Windows. The root user has access to the entire operating system and can do anything. By default, you don’t have root access to your Android device, and certain apps won’t function without root access.With root access, you can disable the bloatware that comes with your phone, manually deny app permissions, run a firewall, access the entire file system, or tether your device, even if tethering functionality has been disabled. You’ll find many apps that require root access in the Google Play store (formerly known as the Android Market), although they won’t function until you root your device.

Rooting isn’t mandatory – you only need to root your device if you want to do things that require root access.
Warnings
Before you root your Android phone or tablet, there are a few things you should be aware of:Warranty – Some manufacturers assert that rooting voids your device’s warranty. However, rooting will not actually damage your hardware. You can “unroot” your device and manufacturers won’t be able to tell if it’s been rooted.
Security – Google Wallet, in particular, has a vulnerability on rooted devices that could allow other apps to access your PIN and other wallet information. Google Wallet displays a warning message if you run it on a rooted device. If you’re one of the few people using Google Wallet for NFC payments, you may want to reconsider rooting your device.
Bricking – Rooting a device is a very safe process. However, there’s always some danger of “bricking” a device when you go outside the normal parameters and hack around with it — particularly if you’re trying to root a device or operating system version not supported by a tool. “Bricking” refers to breaking the device, making it about as useful as a brick. When you root, jailbreak, or install a custom ROM, or otherwise hack around, you do so at your own risk. It’s a good idea to do a little bit of research first and see if other people report success rooting your device.
Setup
The actual rooting process itself should only take a single click. However, you’ll need to do a few quick things first:Download and install the Java JDK and Android SDK on your computer before continuing. Java must be installed before the Android SDK.
Enable USB debugging on your Android. On the device, go into the Settings screen, tap Applications, tap Development, and enable the USB debugging check box.

Connect your Android to your computer using its included USB cable. Don’t mount the device’s SD card on your computer – just plug it in.
You’ll also need the USB drivers for your phone or tablet installed. SuperOneClick itself should be able to automatically install the appropriate drivers – however, if this fails, you’ll need to download and install the appropriate drivers from the device manufacturer’s website.
Rooting With SuperOneClick
We’ll be rooting with SuperOneClick here. It’s a single-click way to root that supports a wide variety of different devices and should work for most people. If SuperOneClick doesn’t support your Android device, head over to the Android Development and Hacking forums at XDA Developers. There are subforums for most Android devices – type your device’s name into the search box and you’ll probably find information from other people that have successfully rooted it, perhaps by using another tool.You can find download links for SuperOneClick at shortfuse.org, SuperOneClick’s official website. After downloading it, run the SuperOneClick.exe application.

Click the Root button in the SuperOneClick window and SuperOneClick should do the rest.

The process will take a few minutes. If you run into a problem, you might want to check the XDA Developers forum for your device, which we mentioned above, or run a Google search.

Restart your Android after rooting it.
Superuser
SuperOneClick automatically installs the SuperUser binary, which is also available from Google Play. Whenever an app on your device attempts to gain root permissions by calling the su command (just like calling the su command on Linux) you’ll be prompted to allow or deny the request.
Open the Superuser app to control the saved permissions and configure Superuser.
Now you’re free to install and use apps that require root access. We’ll have more coverage of things you can do with a rooted Android in the near future.
Everything You Need to Know About Rooting Your Android Phone

We love
Android, but rooting your phone can give you the opportunity to do so
much more than your phone can do out of the box—whether its wireless
tethering, speeding it up with overclocking, or customizing the look of
your phone with themes. Here's what you need to know about the rooting
process, and where to find a guide for your phone.
Update:
This used to be our always up-to-date rooting guide, which proved to be
too large an undertaking for us to keep up. It was a nice try, but
seeing as we only have a few Android phones to test, we couldn't
reliably keep it up to date. So, we've changed this guide into more of a
general resource for those of you that want to get into rooting. Check
out the glossary below to get acquainted with important rooting terms,
then check out where to go to find out how to root your device. We can't
give you the instructions ourselves, but hopefully we can give you a
push in the right direction and make the process easier for you.
What Is Rooting, Exactly?
Rooting,
for those of you that don't know, means giving yourself root permissions
on your phone. It's similar running programs as administrators in
Windows, or running a command with
sudo in Linux. With a rooted phone, you can run more apps (like backup or tethering apps), as well as flash custom ROMs to your phone, which add all sorts of extra features. If you're on the fence about rooting, check out our top 10 root-only apps that make it worth the hassle.Glossary of Rooting Terms
As you
learn more about the rooting process, you'll probably run into a bunch
of terms that can be confusing. Here are some of the most important ones
and what they mean.
Rooting Terms
- Root: Rooting means you have root access to your device—that is, it can run the
sudocommand, and has enhanced privileges allowing it to run apps like Wireless Tether or SetCPU. You can root either by installing the Superuser application—which many of the below root processes include—or by flashing a custom ROM that has root access included. - ROM: A ROM is a modified version of Android. It may contain extra features, a different look, speed enhancements, or even a version of Android that hasn't been released yet. We won't discuss ROMs in depth here, but if you want to use one once you're rooted, you can read more about doing that here.
- Flash: Flashing essentially means installing something on your device, whether it be a ROM, a kernel, or something else that comes in the form of a ZIP file. Sometimes the rooting process requires flashing ZIP file, sometimes it doesn't.
- Bootloader: Your bootloader is the lowest level of software on your phone, running all the code that's necessary to start up your operating system. Most bootloaders come locked, which keeps you from rooting your phone. Unlocking your bootloader doesn't root your phone directly, but it does allow you to root, then flash custom ROMs if you so desire.
- Recovery: Your recovery is the software on your phone that lets you make backups, flash ROMs, and perform other system-level tasks. The default recoveries can't do much, but you can flash a custom recovery—like ClockworkMod—after you've unlocked your bootloader that will give you much more control over your device. This is often an integral part of the rooting process.
- ADB: ADB stands for Android Debug Bridge, and it's a command line tool for your computer that can communicate with an Android device you've connected to it. It's part of the Android Software Developers Kit (SDK). Many of the root tools below use ADB, whether you're typing the commands yourself or not. Unless the instructions call for installing the SDK and running ADB commands, you won't need to mess with it—you'll just need to know that it's what most of the tools use to root your phone.
- S-OFF: HTC phones use a feature called Signature Verification in HBOOT, their bootloader. By default, your phone has S-ON, which means it blocks you from flashing radio images—the code that manages your data, Wi-Fi, and GPS connections. Switching your phone to S-OFF lets you flash new radios. Rooting doesn't require S-OFF, but many rooting tools will give you S-OFF in addition to root access, which is nice.
- RUU and SBF: ROM Upgrade Utilities (for HTC phones) and System Boot Files (for Motorola phones) are files direct from the manufacturer that change the software on your phone. RUU and SBF files are how the manufacturers deliver your over-the-air upgrades, and modders often post leaked RUU and SBF files for flashing when the updates haven't been released yet. They're also handy when downgrading your phone, if a rooting method isn't available for the newest software version yet. You can flash RUUs right from your HTC phone, but Motorola users will need a Windows program called RSD Lite to flash SBF files.
Rooting Methods
This
section is currently out of date. We're working on revising it for the
new version of this guide. If you want to root your phone, check out the
XDA Developers forums for tools and guides for your specific device.
The method you use depends on the phone you have. Some rooting tools root multiple phones, and HTC's official unlocking method
will unlock the bootloader of nearly any HTC phone—which gets you part
of the way toward rooting (you'll need to look up more information on
how to flash a recovery to your specific device). It's also worth
mentioning that there can be multiple methods out there. HTC's official
route isn't always the easiest method, so if your phone has a one-click
tool available, it's usually better to use that because it's quicker,
will give you S-OFF, and won't leave a digital "watermark" on your phone
that permanently voids your warranty. Lastly, SuperOneClick is a great one-click app that roots a ton
of phones, especially older ones, so do a bit of googling and see if it
works for yours—because it's just about the easiest root method out
there.
The best way to research your phone, though, would be to check out the All Things Root section of your phone's forum at Android Forums.
If you find your phone's subforum and click on All Things Root, there's
almost always a sticky post with info on rooting methods, ROMs, and
other special troubleshooting tips that could apply to your specific
phone. Looking up your phone on the XDA Developers forums is always a great idea too, and the CyanogenMod Wiki
often has lots of information on rooting and flashing ROMs as well
(even if you aren't flashing CyanogenMod). With a bit of research, you
should be able to find at least one guide that works for your specific
device.
Saturday, June 29, 2013
Things to Do Before and After Installing a Custom ROM + Troubleshooter

Android being an Open Source operating system
for mobile phones, offers limitless possibilities of optimization and
customization as per your requirements. Half the charm of an Android
phone lies in the root-based apps, beautiful mods and patches, and
custom ROMs. If you have not rooted your phone yet, believe me you are
not getting the most out of it. Rooting offers many advantages indeed
but, at the same time it is also a little risky as it breaks into the
wall of security build by the operating system.
According to a survey, 80% of Android
phone users live happy with an unrooted device and the reasons for this
are various- some people think of it as a sort of criminal activity,
some are afraid of losing warranty, some are afraid of bricking
their phone, while most people do not even know about the existence of a
term like “rooting”. If you are one who has enclosed himself in side
that great wall of security and have doubt in mind related to rooting,
do not forget to read the following article:
Anyways, the procedures like rooting and
installing a custom ROM is a bit risky and it’s true, but if you go
through it carefully, no harm will ever done to your Android device.
People brick their phone because they make some mistake. That’s the way
accidents happen! As an Android blogger, I have to root, flash stock and
custom ROMs, install mods and patches almost everyday. And believe me
all my device are pretty healthy and sound. If you understand things,
take precautions, create backups and do things carefully, you’ll never be caught into an uncomfortable situation.
Here are a few tips that that will help
you keep things under your control and you will be able to not only keep
all your data safe, but also restore your device to its normal
condition.
Got TWRP Recovery on Your Device?
Do you think you are well familiar with
all the features, functions and possibilities of the TWRP Recovery?
Think again! Read our detailed and in-depth introduction to the Team Win
Recovery Project: Click Here
Ensure Decent Battery Level

Whenever you have to install a custom
ROM or mod or mod on your phone, try to be ready for the worst
situations. Just imagine you are installing a ROM and your phones turns
off in the middle of things due to low battery! You will have to charge
the battery with an external charger because your device will not be
able to charge the battery because it does not have any ROM that makes
this function work. In such a situation, you will not be able to restart
the procedure or even restore from a backup Therefore, it very
important that your phone is amply charged before you set out on the
adventure.
Backup Your Apps, Contacts, Messages, etc.
Whether you have rooted your phone or
not, always backup your apps, contacts, call-log, messages, bookmarks,
calendar entries, etc. The best way is to schedule regular backups, preferably to external storage of your device and your computer. Here are some nice free apps that will make this task easy for you.
Put Your Phone in Debugging Mode
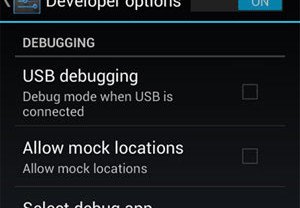
The term “debugging” is used in connection with development. Putting your Android device in debugging mode prepares it for direct connection with your computer via a USB cable without notification
or read log data. Flashing/installing anything that does not come under
official method, might be regarded as a development activity. It’s
another thing that you did not developed the ROM you are going to
install, but still it is a work of custom development. That’s is why,
whenever you perform any such task, it is highly recommended that you
turn on the USB Debugging mode from Developer Options under Settings of your device. On Android phones with Jelly Bean 4.2 and higher, the Developer Options are hidden by default and can be made to show by tapping 7 times on “Build Version” from Settings> About.
Further, you should also install the
appropriate USB Drivers on your computer as you can need them anytime.
To download the compatible USB Drivers for your phone/manufacturer, visit our USB drivers collection page.
Backup Your Phone’s IMEI
When you install a custom ROM on you
phone, sometimes it happens that the folder that stores your phone’s
IMEI (International Mobile Equipment Identity) number is wiped. As a
result, your phone’s IMEI number is lost it does not receive network
signal. To avoid this happen to your phone, do not forget to backup a
folder called “efs”. You will be able to access the “efs” folder only when you have root privileges on your Android device.
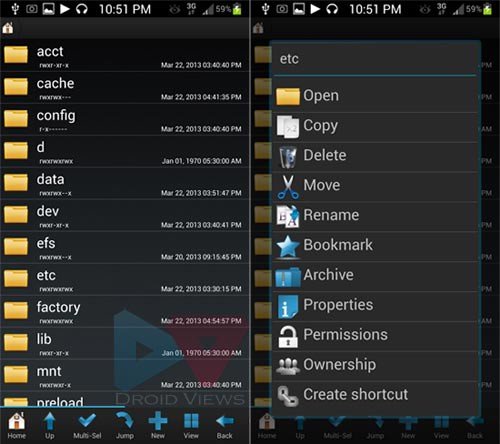
To access efs data, download a root file explorer app like Root Browser, Root Explorer, X-plore File Manager, etc. You can use any other app of you preference.
Okay, open the root file manager app and look for a folder called “efs”.
You will easily find it as it is found on the root location of your
device’s internal partition (see below). Just press and hold the “efs“ folder and select “Copy”.
Now paste the folder on the external SD Card storage of you phone. It
will be even better if you copy it to your computer too. Suppose you
flash a custom ROM and lost your phone’s IMEI, what will you do? Having
backed up the efs data, you can easily restore your lost IMEI by restoring the “efs” folder back to its place.
In case you have a low/mid range Galaxy device from Samsung, you can use an app called Galaxy ToolBox for the purpose.
Download: Galaxy ToolBox.apk (187.15 KB)
Enter Recovery Mode Easily:
If you are a hard-core Android
enthusiast who likes to play with new ROMs and mods every now and then,
be careful or you might damage the hardware keys of your Android phone.
Since booting into recovery mode of a phone or tablet requires
hard-pressing of certain combination of hardware keys, doing it
frequently can have a negative effect
on the functioning of these keys. I have experience it myself when I
had a Galaxy S. Fortunately, there are several apps that can make
booting into download, bootloader or recovery mode very easy without being cruel to the poor hardware keys.
Here are some good free apps
for you that will let you do this without touching the hard keys. If
you have installed a custom ROM, you need not install any such app
separately as most ROM developers integrate the boot options in the ROM
itself. Besides, we have an vast collection of methods of entering
Fastboot, Bootloader, Download and Recovery modes on most Android devices.
Backup the Complete ROM (Important)
Being able to install a custom ROM on your Android phone means that you have installed custom recovery like ClockworkMod
or TWRP on your Android device. Well, having a custom recovery on any
phone is a great advantage. It can perform all tasks done by stock recovery while adding lots of other useful options.
One such great feature is its ability to
backup the whole ROM, custom or stock, on your phone’s internal or
external storage. You can back as many ROMs as your phone’s storage can
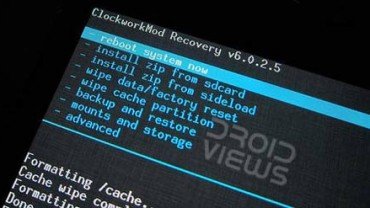
afford. I strongly recommend that you always keep a backup of your phone’s original/stock ROM. Before you install a new custom ROM, always create a backup of your current ROM. Scroll down to the “backup and restore”
option and backup the ROM to the internal or external storage of you
device. If you select “backup”, the ROM will be saved to internal
storage. To save it to external SD card, select “backup to external
sdcard” option.
All backed up ROMs are saved on a folder called “clockworkmod” on your device’s internal or external SD card, depending on what location you chose while creating the backup.
It’s is always better to store the
backed up ROM on the external storage because sometimes the phone is
caught in a bootloop, or the screen goes into a frozen state, or you may
experience lags, or anything, and decide to reset/wipe
your phone to get it back to normal. In doing so, all data stored on
the internal storage is deleted. In certain situations you might have
the opportunity to backup your data but in some cases you might not be
able to do that.
How to Restore a Previously Backed up ROM:
As I said earlier, you should always
keep a backed up copy of the rooted stock ROM on the external SD card of
your phone. If the phone does not have an external SD slot, you can
save the backup to the internal SD card (not safe though). If you
frequently flash an AOSP, AOKP or CM based ROM, always keep a copy of
the Google Apps flashable zip saved on your phone.
So if you installed a custom ROM and you are having problems with it
or you just want to go back to the previous or any backed up ROM, do
this:- Boot you phone into CWM recovery mode
- “wipe data/factory reset”
- “wipe cache partition”
- Then go to “backup and restore> restore”, select the location (internal or external) of the backup.
- Select the file and confirm your choice by selecting “yes”.
So, this was a detailed tutorial to help
you land safely whenever you install a ROM. I have tried to be
inclusive but if feel that something is missing, do not forget to share
with us via comments. I believe the tips given here will prove useful to
you. Thanks for being with us! For more Tips & Tricks on Android, take a tour of our other tutorials.
Installing a Custom ROM
Now here is my classic way of installing
a custom ROM. I recommend it to all because it has proved perfectly
successful and never hurled down my phones into a single bootloop so
far. Always follow these steps in CWM Recovery:
- “wipe data/factory reset”
- “wipe cache partition”
- Go to advanced and “wipe dalvik cache” and “wipe battery stats”
- Go to mounts and storage and “format system”
- The go to “install zip from sdcard> choose zip from sdcard” and select the ROM file you want to install.
- In case, the developer has recommended to install GApps too, you should install it just after flashing the ROM (use Step 5).
- When it is installed, reboot the device.
Installing a custom ROM with these wipes
has a great advantages. Whenever you flash a new ROM, install it as
fresh copy. Less wipes means more chances of old and new system files’
clash, resulting in poor performance, lags and even a bootloop. While
some enlightened giants might disapprove of the idea of wiping the
battery stats of the old ROM, I still recommend to wipe it as it takes
nothing. However, you should also listen to any recommendations of the
developer whose ROM you are going to install.
Installing Google Apps
Most AOSP (Android Open Source Project),
AOKP (Android Open Kang Project) and CyanogenMod based ROMs do not come
with the Google apps pre-installed, so you have to install them
separately. To download and install the latest and compatible Google
apps to your phone, head over to our great collection.
Getting Signature Verification Error While Installing?
Well, it is an uncommon situation that
while installing a custom ROM on your Android device you see
installation aborted message because of Signature Verification error.
Two possible reasons for this to happen might be-
- You are trying to install a custom ROM using stock recovery that comes default with all Android phones. Remember, a custom ROM or mod requires a custom recovery like CWM or TWRP installed on it. If you are getting signature error, first of all try to find out the type of recovery your phone has. Boot into the recovery mode and read the lines on the top of the screen. If it reads “Android System Recovery”, you need to install a custom recovery first.
- The most common reason for the signature verification error while installing a ROM is a badly downloaded zip. All custom ROMs and mods for Android devices come in ZIPs that are packed with a MD5 Signature. If a downloaded zip is corrupt, it is sure to have a corrupt signature. To fix this, you can take aid of a MD5 Signature versification tool. You can also try to extract the downloaded zip on your computer. One nice quality of a ZIP archive is that it cannot be extracted properly if it is corrupt. In the case of a bad zip file, you should redownload it and try installing again.
(Status 7) Installation Aborted Error
Another instance of installation of a custom ROM or mod aborted might be due to the presence an older or incompatible version of ClockworkMod Recovery on your Android device. In such cases, you will get the following message while installing the ROM:– installing : /sdcard/xxxxxxxxx.zip
finding update package…
opening update package…
installing update…
assert failed: getprop(“ro.product.device”) == “m0″ || getprop(“ro.bulid.product”)
== “m0″ || getprop(“ro.product.device”) == “galaxy s3″ || getprop(“ro.bulid.product”)== “galaxy s3″
E: Error in /sdcard/xxxxxxxxx.zip
(status 7)
installation aborted.
To solve this issue, you can try
updating your CWM recovery. There is another solution to this too but
it’s is a little tricky. In this method, you’ll have to edit a code line
in the “updater-script” found inside the ROM .zip file without extracting it.
If you prefer to do this, remove the following lines found at the beginning of “updater-script” found at this path: ROM.zip> META-INF> com> google> android> updater-script:
 assert(getprop("ro.product.device") == "m0" ||
 getprop("ro.build.product") == "m0" || getprop("ro.product.device") == "galaxys3" || getprop("ro.build.product") == "galaxys3");
Upgrading Custom ROM without Loosing Apps & Settings

We always recommend a full wipe before
installing a new custom ROM for best performance. Doing this, deletes
all the apps and resets the Settings of your device and this is
certainly not a desirable thing. Nobody wants to install all apps and
configure the device again and again. While you have no option but to
wipe everything with a new ROM, things can be more pleasant if you are
going to install a greater updated version of the same ROM.
You can upgrade your phone’s custom ROM
without losing your installed apps, data, contacts, messages, call-log
and settings. Here are the steps that you need to follow while
installing the newer update package of a ROM over an older one:
- Copy the custom ROM in zip package to your device.
- Boot the phone in CWM or TWRP recovery.
- Wipe the cache partition
- Wipe dalvik cache (found under “advanced” option in CWM)
- Then install the ROM and when it is done, wipe dalvik cache again.
- Finally, reboot the device.
Recovering from a Bootloop

Having performed the wipes recommended
above, there are nominal chances that your phone might be stuck on the
bootscreen but in case you get into such a situation, what would you do?
Bootloop is a situation when your phone
refuses to boot/start normally due to some system file clash or
incompatible element that prevents it to boot. To recover from a
bootloop, follow the steps given at this tutorial.
How to Install a Mod or Patch or Kernel:
If your phone is on the stock ROM with
CWM installed or a custom ROM, you can find different Mods and patches
and Kernel for your device. If you have to install any such file, do
this:
- Boot your phone into CloclworkMod recovery mode.
- Again, do not forget to backup your current ROM before flashing anything on your phone.
- Go to “install zip from sdcard> choose zip from sdcard” and select the file you want to install.
- When the installation is done, go to “advanced” and “wipe dalvik cache” (not necessary in all cases).
- Finally reboot device using “reboot system now” option.
Avoid Restoring Apps & Data Backed Up on Another ROM:

Whatever ROM we install on our device,
we want it to be quickly ready with our favorite apps and configuration.
And therefore we keep all such data backed up so that they we can
restore them in case we factory reset the device or install a new ROM.
Restoring previously backed up apps or data is a a very convenient thing
as it saves a lot of time and effort but this convenience might give
rise to another inconvenient situation.
In fact, all such backup apps (Titanium
Backup, for example) are meant to restore data on the same ROM on which
the backup was created. Due to system file discrepancies among different
ROMs, restoring apps and data this way might make your phone laggy and
slow. Therefore, I recommend you to avoid doing this for better
performance of the new ROM.
Fixing Battery Heat Up and Drain:

Better performance and battery-life is
why most of us turn to custom ROMs. We keep trying from the available
ROMs and stick to one that meets up to our expectations. Now there are
two ways to find out how the battery performs- with the help of a
battery monitor app (stock or third-party) and by taking note of the
battery performance during the hours of a day.
If you feel that your device is not
yielding good battery just because the battery monitor stats show it,
you might be wrong in your judgement as most such apps sometimes lie to
us.
Remember that with any ROM installed on your Android device, you will discover two things: 1. battery heat up, and 2.
battery drain. And these issues for the most part are due to process of
your phone’s new software and battery sync. It usually requires 3-4
full-charge and discharge cycles before things go to a normal state and
after this, you will notice great improvement in battery performance.
So, do not be quick in concluding anything about battery.
Let the battery calibrate and while you
wait try one more thing. Whether you get a new phone or new software on
your old device, avoid putting your device into charging mode
frequently. Turn off the phone, plug charger, wait till it is fully
charged and then use it till it is fully discharged. Repeating this
several times will improve the battery-life of your device. I have
tested it and it really works.
Offline voice typing (Jelly Bean)
Offline voice typing (Jelly Bean)
One of the big improvements in Jelly Bean was the ability to let your phone or tablet convert your speech to text. Phones have done that for a while now, but it generally meant sending your input over the air, doing the decoding in the cloud, and showing the result on your device. Android can now do the text generation itself -- which makes it a speedier process, and possible even without an Internet connection.- Head over to "Language and Input" in the Settings app,
- then choose "Download offline speech recognition"
- under the "Voice Search" heading.
- You'll be prompted to download a language pack for each language you want Android to recognize; once that's done you'll be able to dictate text even if Google's servers go down or you've got poor reception.
Samsung Mobile Cheat Codes
Samsung Mobile Cheat Codes
*#06# -> Displays imei
*2767*5282# -> Java Reset and (Deletes all Java Midlets)
*2767*63342# -> Reset Media (Deletes All Sounds and Pics)
*2767*927# -> Wap Reset
*#9998*4357# -> Help Menu
*#9998*5282# -> Java menu (GRPS/CSD settings for JAVA server)
*#9999#0# -> Monitor Mode
*#9999# or *#9998*9999# -> Software Version
*#8888# or *#9998*8888# -> Hardware Version
*#9998*746# or *#9998*0746# or *#0746# -> Sim Infos
*#9998*523# or *#9998*0523# or *#0523# -> Display Contrast
*#9998*842# or *#9998*0842# or *#0842# -> Vibration On (until you push OK)
*#9998*289# or *#9998*0289# or *#0289# -> Buzzer On (until you push OK)
*#9998*288# or *#9998*0288# or *#0288# -> Battery & Field Infos
*#9998*377# or *#9998*0377# Error log
*#9998*778# or *#9998*0778# or *#0778# -> Sim Service table
*#9998*782# -> show date and alarm clock
*#8999*638# -> show network information
*#9998*5646# -> change operator logo at startup
*#9998*76# -> production number
*#9998*968# -> view melody for alarm
*#9998*585# -> Non-Volatile Memory (NVM)
*#3243948# -> Digital Audio Interference Off
*#32436837# -> Digital Audio Interference
*#9999# -> Show Software Version
*#0837# -> Show Software Version (instructions)
*#0001# -> Show Serial Parameters
*#9125# -> Activates the smiley when charging.
*#9998*228# -> Battery status (capacity, voltage, temperature)
*#9998*246# -> Program status
*#9998*324# -> Debug screens
*#9998*364# -> Watchdog
*#9998*427# -> Trace Watchdog
*#9998*544# -> Jig detect
*#9998*636# -> Memory status
*#9998*785# -> RTK (Run Time Kernel) errors
*#9998*786# -> Run, Last UP, Last DOWN
*#9998*837# -> Software Version
*#9998*862# -> Vocoder Reg - Normal, Earphone or carkit can be selected
*#9998*872# -> Diag
*#9998*947# -> Reset On Fatal Error
*#9998*999# -> Last/Chk
*#9998*9266# -> Yann debug screen (=Debug Screens?)
*#9998*9999# -> Software version
*2767*2878# -> Custom EEEPROM Reset
*2767*3855# -> Full EEPROM Reset
This code will remove sp lock in some models
But also changes IMEI to 447967-89-400044-0,
____________________________________________
Samsung A300, A400, A800
*2767*637#
____________________________________________
Samsung E500, E700
*2767*688#
In newer phones:
#*7337#
____________________________________________
Samsung E715
Turn off the phone. Put a non-accepted Simcard and turn it on.
Type *#9998*3323#. Press Exit. Choose menu #7. After phone reboots type *0141# and hit the Call button. Turn off and insert another Simcard. Turn on. The code is 00000000.
In newer phones: #*7337#
____________________________________________
Samsung M100
Type *#9998*627837793#. Then type *#9998*737#. Press >/[] (Play Stop) until phone shows NCK/SPCK number. Press Exit.
Type #0111*CODE# (Code is the last 8 digits of the NCK/SPCK)
____________________________________________
Samsung P400
*2767*3855#
In newer phones:
*2767*927#
____________________________________________
Samsung S100, S300
*2767*7822573738#
____________________________________________
Model: Samsung S105
Remove Simcard. Enter *2767*7822573738# and after phone reboots, enter #0111*00000000#
____________________________________________
Samsung s300 unlock code
enter these 5 codes without sim card in phone!
your phone should then be unlocked
1. *2767*63342#
2. *2767*3855#
3. *2767*2878#
4. *2767*927#
5. *2767*7822573738
____________________________________________
Samsung S307
Turn off the phone. Put a non-accepted Simcard and turn it on.
Type *#9998*3323#. Press Exit. Choose menu #7. After phone reboots type *0141# and hit the Call button. Turn off and insert another Simcard. Turn on. The code is 00000000.
In newer phones: #*7337#
____________________________________________
Samsung S500
*2767*3855#
In newer phones:
*2767*927#
____________________________________________
Samsung SGH600, SGH2100
*2767*3855#
*2767*2878#
____________________________________________
Samsung v200 unlock codes
Enter these codes into phone without sim in phone
This will not work on some new versions
1. *2767*63342# then press green button
2. *2767*3855# then press green button
3. *2767*2878# then press green button
4. *2767*927# then press green button
5. *2767*7822573738# then press green button
____________________________________________
Samsung X100, X600
Turn off the phone. Put a non-accepted Simcard and turn it on.
Type *#9998*3323#. Press Exit. Choose menu #7. After phone reboots type *0141# and hit the Call button. Turn off and insert another Simcard. Turn on. The code is 00000000.
In newer phones:
#*7337#
____________________________________________
Samsung Universal
TEMPORARY UNLOCK:
Put a non-accepted Simcard and turn it on. Type *#9998*3323#.
Press Exit. You will get a new menu. Select Malloc Fail.
In newer phones:
#*7337#
- IMEI number: * # 0 6 #
- Software version: * # 9 9 9 9 # albo * # 0 8 3 7 #
- Net Monitor: * # 0 3 2 4 #
- Chaning LCD contrast: * # 0 5 2 3 #
- Memory info: * # 0 3 7 7 # albo * # 0 2 4 6 #
- Reset pamieci (SIMLOCK`a removing!!!): *2767*3855#
- Reset pamieci CUSTOM: *2767*2878#
- Battery state: * # 9 9 9 8 * 2 2 8 #
- Alarm beeper: *#9998*289#
- Vibra test: *#9998*842#
- IMEI number: * # 0 6 #
- Software version: * # 9 9 9 9 #
*#06# -> Displays imei
*2767*5282# -> Java Reset and (Deletes all Java Midlets)
*2767*63342# -> Reset Media (Deletes All Sounds and Pics)
*2767*927# -> Wap Reset
*#9998*4357# -> Help Menu
*#9998*5282# -> Java menu (GRPS/CSD settings for JAVA server)
*#9999#0# -> Monitor Mode
*#9999# or *#9998*9999# -> Software Version
*#8888# or *#9998*8888# -> Hardware Version
*#9998*746# or *#9998*0746# or *#0746# -> Sim Infos
*#9998*523# or *#9998*0523# or *#0523# -> Display Contrast
*#9998*842# or *#9998*0842# or *#0842# -> Vibration On (until you push OK)
*#9998*289# or *#9998*0289# or *#0289# -> Buzzer On (until you push OK)
*#9998*288# or *#9998*0288# or *#0288# -> Battery & Field Infos
*#9998*377# or *#9998*0377# Error log
*#9998*778# or *#9998*0778# or *#0778# -> Sim Service table
*#9998*782# -> show date and alarm clock
*#8999*638# -> show network information
*#9998*5646# -> change operator logo at startup
*#9998*76# -> production number
*#9998*968# -> view melody for alarm
*#9998*585# -> Non-Volatile Memory (NVM)
*#3243948# -> Digital Audio Interference Off
*#32436837# -> Digital Audio Interference
*#9999# -> Show Software Version
*#0837# -> Show Software Version (instructions)
*#0001# -> Show Serial Parameters
*#9125# -> Activates the smiley when charging.
*#9998*228# -> Battery status (capacity, voltage, temperature)
*#9998*246# -> Program status
*#9998*324# -> Debug screens
*#9998*364# -> Watchdog
*#9998*427# -> Trace Watchdog
*#9998*544# -> Jig detect
*#9998*636# -> Memory status
*#9998*785# -> RTK (Run Time Kernel) errors
*#9998*786# -> Run, Last UP, Last DOWN
*#9998*837# -> Software Version
*#9998*862# -> Vocoder Reg - Normal, Earphone or carkit can be selected
*#9998*872# -> Diag
*#9998*947# -> Reset On Fatal Error
*#9998*999# -> Last/Chk
*#9998*9266# -> Yann debug screen (=Debug Screens?)
*#9998*9999# -> Software version
*2767*2878# -> Custom EEEPROM Reset
*2767*3855# -> Full EEPROM Reset
This code will remove sp lock in some models
But also changes IMEI to 447967-89-400044-0,
____________________________________________
Samsung A300, A400, A800
*2767*637#
____________________________________________
Samsung E500, E700
*2767*688#
In newer phones:
#*7337#
____________________________________________
Samsung E715
Turn off the phone. Put a non-accepted Simcard and turn it on.
Type *#9998*3323#. Press Exit. Choose menu #7. After phone reboots type *0141# and hit the Call button. Turn off and insert another Simcard. Turn on. The code is 00000000.
In newer phones: #*7337#
____________________________________________
Samsung M100
Type *#9998*627837793#. Then type *#9998*737#. Press >/[] (Play Stop) until phone shows NCK/SPCK number. Press Exit.
Type #0111*CODE# (Code is the last 8 digits of the NCK/SPCK)
____________________________________________
Samsung P400
*2767*3855#
In newer phones:
*2767*927#
____________________________________________
Samsung S100, S300
*2767*7822573738#
____________________________________________
Model: Samsung S105
Remove Simcard. Enter *2767*7822573738# and after phone reboots, enter #0111*00000000#
____________________________________________
Samsung s300 unlock code
enter these 5 codes without sim card in phone!
your phone should then be unlocked
1. *2767*63342#
2. *2767*3855#
3. *2767*2878#
4. *2767*927#
5. *2767*7822573738
____________________________________________
Samsung S307
Turn off the phone. Put a non-accepted Simcard and turn it on.
Type *#9998*3323#. Press Exit. Choose menu #7. After phone reboots type *0141# and hit the Call button. Turn off and insert another Simcard. Turn on. The code is 00000000.
In newer phones: #*7337#
____________________________________________
Samsung S500
*2767*3855#
In newer phones:
*2767*927#
____________________________________________
Samsung SGH600, SGH2100
*2767*3855#
*2767*2878#
____________________________________________
Samsung v200 unlock codes
Enter these codes into phone without sim in phone
This will not work on some new versions
1. *2767*63342# then press green button
2. *2767*3855# then press green button
3. *2767*2878# then press green button
4. *2767*927# then press green button
5. *2767*7822573738# then press green button
____________________________________________
Samsung X100, X600
Turn off the phone. Put a non-accepted Simcard and turn it on.
Type *#9998*3323#. Press Exit. Choose menu #7. After phone reboots type *0141# and hit the Call button. Turn off and insert another Simcard. Turn on. The code is 00000000.
In newer phones:
#*7337#
____________________________________________
Samsung Universal
TEMPORARY UNLOCK:
Put a non-accepted Simcard and turn it on. Type *#9998*3323#.
Press Exit. You will get a new menu. Select Malloc Fail.
In newer phones:
#*7337#
Subscribe to:
Posts (Atom)